Upgrade GEPRC Cinelog30 V3
Upgrade GEPRC Cinelog30 V3: GPS Installation & LED Removal Guide (2026)
Advanced Cinewhoop Optimization • Mall of Aviation
Quick Summary: Want to upgrade GEPRC Cinelog30 V3 for better performance? This complete guide covers GPS installation, LED removal, weight reduction, compass setup, and GPS Rescue mode configuration — everything you need to improve flight safety, efficiency, and cinematic quality.
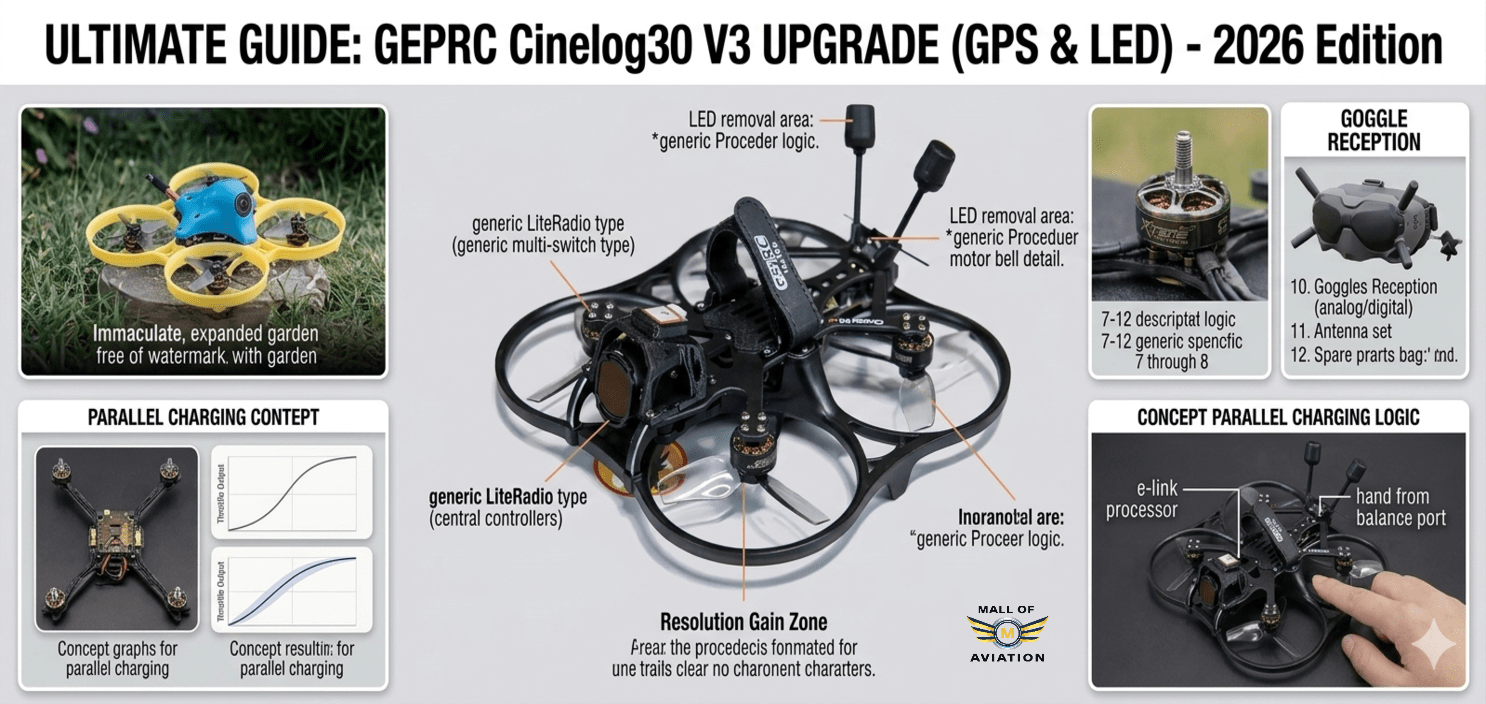
Upgrade GEPRC Cinelog30 V3 and transform it from an already excellent cinewhoop into a genuinely professional cinematic platform. The GEPRC Cinelog30 V3 is widely recognized as one of the finest sub-250g cinewhoops available for professional-grade cinematic FPV flying. Its compact 3-inch ducted frame, compatibility with the DJI O4 Pro digital video system, and smooth, stable flight characteristics make it a favourite among content creators, travel filmmakers, and FPV enthusiasts who demand the highest quality footage.
However, even the best production drones ship with compromises. Manufacturers must balance cost, general usability, and broad market appeal — which means a drone like the Cinelog30 V3 is tuned and configured for the average use case, not for peak performance in specialized scenarios. For pilots who want to upgrade GEPRC Cinelog30 V3 to its full potential — whether for longer flight times, better safety features, more reliable signal systems, or higher quality video — there is meaningful room for improvement through targeted hardware modifications and software configuration.
The upgrades covered in this guide are practical, affordable, and based on real-world flying experience with the Cinelog30 V3 platform. None of them require advanced engineering skills — only basic soldering ability, patience, and willingness to spend a few hours making meaningful improvements. Whether you are a weekend hobbyist flying in your local park or a professional cinematographer pushing this platform to its limits, this guide will help you upgrade GEPRC Cinelog30 V3 into the most capable version of itself.
In this comprehensive guide by Mall of Aviation, we cover everything from LED removal and weight optimization, to full GPS module installation with compass remapping, Betaflight configuration, GPS Rescue mode setup, and cinematic video improvements with ND filters. According to Betaflight’s official documentation, GPS Rescue is one of the most important safety features available for FPV pilots — and this guide shows you exactly how to set it up on the Cinelog30 V3.
In This Guide
- Why Upgrade GEPRC Cinelog30 V3?
- Understanding the Sub-250g Weight Limit
- Weight Optimization Strategy
- Removing the LED Strip — Step by Step
- Betaflight LED and Mode Cleanup
- Choosing the Right GPS Module
- GPS Mounting Solutions for the Cinelog30 V3
- Wiring GPS to the Flight Controller
- Compass Setup — Advanced I2C Remapping
- Betaflight GPS Configuration — Complete Setup
- GPS Rescue Mode — Setup and Testing
- ND Filters for Cinematic Footage
- PID Tuning After Upgrade GEPRC Cinelog30 V3
- Real-World Performance Improvements
- Upgrade Priority Guide
- Common Mistakes to Avoid
- Final Thoughts
- FAQs
Why Upgrade GEPRC Cinelog30 V3?
When you upgrade GEPRC Cinelog30 V3 with targeted modifications, you address specific stock limitations that hold this platform back from its true potential. The Cinelog30 V3 punches well above its weight class in stock form — its footage quality, stability, and overall design are genuinely impressive for a drone in this size category. But understanding its specific limitations helps you prioritize upgrades intelligently.
Here are the key areas where the stock Cinelog30 V3 configuration leaves meaningful performance on the table:
- No GPS or safety failsafe: The stock Cinelog30 V3 ships without a GPS module. This means there is no GPS Rescue mode — if you lose signal during an indoor or outdoor flight, the drone has no ability to automatically return home. For pilots flying near obstacles, over water, or at any significant distance, this is a genuine safety limitation that makes the GPS upgrade a top priority when you upgrade GEPRC Cinelog30 V3.
- Unnecessary weight from LED components: The prop guards on the Cinelog30 V3 include integrated LEDs that add approximately 4 grams to total weight — significant on a sub-250g platform where every gram directly affects hover efficiency, motor temperature, and flight time.
- Conservative stock PID tune: The factory PID tune prioritizes stability and broad compatibility over optimal performance. After you upgrade GEPRC Cinelog30 V3 hardware, revisiting the tune yields smoother, more efficient flight behavior.
- No compass for advanced position features: Without a properly configured compass, future Betaflight features like Position Hold cannot function correctly. The stock flight controller has a non-standard I2C port configuration that requires remapping — a modification included in this upgrade GEPRC Cinelog30 V3 guide.
- Generic camera settings for variable lighting: Without ND filters, the stock camera configuration is forced into very fast shutter speeds in bright outdoor conditions, producing footage that lacks the natural motion blur characteristic of professional cinematography.
Each upgrade in this guide directly addresses one or more of these limitations. Applied together, they transform your Cinelog30 V3 from an already capable drone into a genuinely professional cinematic tool.
Understanding the Sub-250g Weight Limit Before You Upgrade GEPRC Cinelog30 V3
Before diving into specific modifications, understanding why the 250g weight threshold matters so much is essential for anyone planning to upgrade GEPRC Cinelog30 V3. In most countries — including India under DGCA regulations, the United States under FAA rules, and across the European Union — drones weighing under 250 grams are subject to significantly reduced regulatory requirements compared to heavier aircraft.
In practical terms, drones under 250g can often be flown in locations and at times that are restricted for heavier aircraft, may not require registration, and face less stringent operational limitations. For a cinematic drone designed to capture footage in urban environments and near people, maintaining sub-250g status is a genuine operational advantage.
The stock GEPRC Cinelog30 V3 with LED prop guards, GoPro camera, and battery sits very close to the 250g threshold in many configurations. Adding a GPS module — which typically weighs 5–10 grams — can push the all-up weight above 250g without corresponding weight savings elsewhere. This is why the LED removal modification is not just about efficiency when you upgrade GEPRC Cinelog30 V3 — it is a strategic weight management decision that makes the GPS addition possible while maintaining sub-250g status.
Weight Optimization Strategy to Upgrade GEPRC Cinelog30 V3
Weight optimization when you upgrade GEPRC Cinelog30 V3 is about intelligently identifying and removing mass that provides no flight benefit while preserving everything that matters for performance and safety. Here is a comprehensive approach:
- LED prop guard swap (highest impact): The single most effective weight saving available when you upgrade GEPRC Cinelog30 V3 is replacing the LED-equipped prop guards with the included non-LED black guards. This saves approximately 4 grams without any negative impact on flight performance or structural protection.
- Cable management: Carefully shortening excess cable length on signal wires, securing cables close to the frame with small tie-wraps or silicone adhesive, and removing unused connector pigtails saves 1–2 grams while improving build cleanliness and vibration resistance.
- Battery connector optimization: If you are running the Cinelog30 V3 at cinematic flying power levels, the XT30 connector is appropriate. Ensure you are not running an unnecessarily heavy XT60 connector — the weight difference is approximately 4–5 grams.
- Camera mount assessment: Many aftermarket lightweight TPU mounts weigh less than stock aluminum hardware while providing equal or better vibration isolation for smoother footage.
Applied collectively, these weight optimizations can save 8–12 grams from the stock configuration — enough to accommodate the GPS module addition while maintaining sub-250g all-up weight in most configurations.
How to Remove the LED Strip When You Upgrade GEPRC Cinelog30 V3
The LED removal process when you upgrade GEPRC Cinelog30 V3 is more straightforward than on many other drones because GEPRC includes non-LED prop guards in the box. You do not need to desolder or cut any wiring to achieve the primary weight saving — simply swapping prop guards achieves the majority of the benefit. However, properly disconnecting the LED system from the flight controller is still recommended to free up the associated AUX channel and eliminate any parasitic power draw.
Tools Required to Upgrade GEPRC Cinelog30 V3 LEDs
- Small Phillips screwdriver (for prop guard screws)
- Tweezers or small flat blade (for connector removal)
- Betaflight Configurator (for software cleanup)
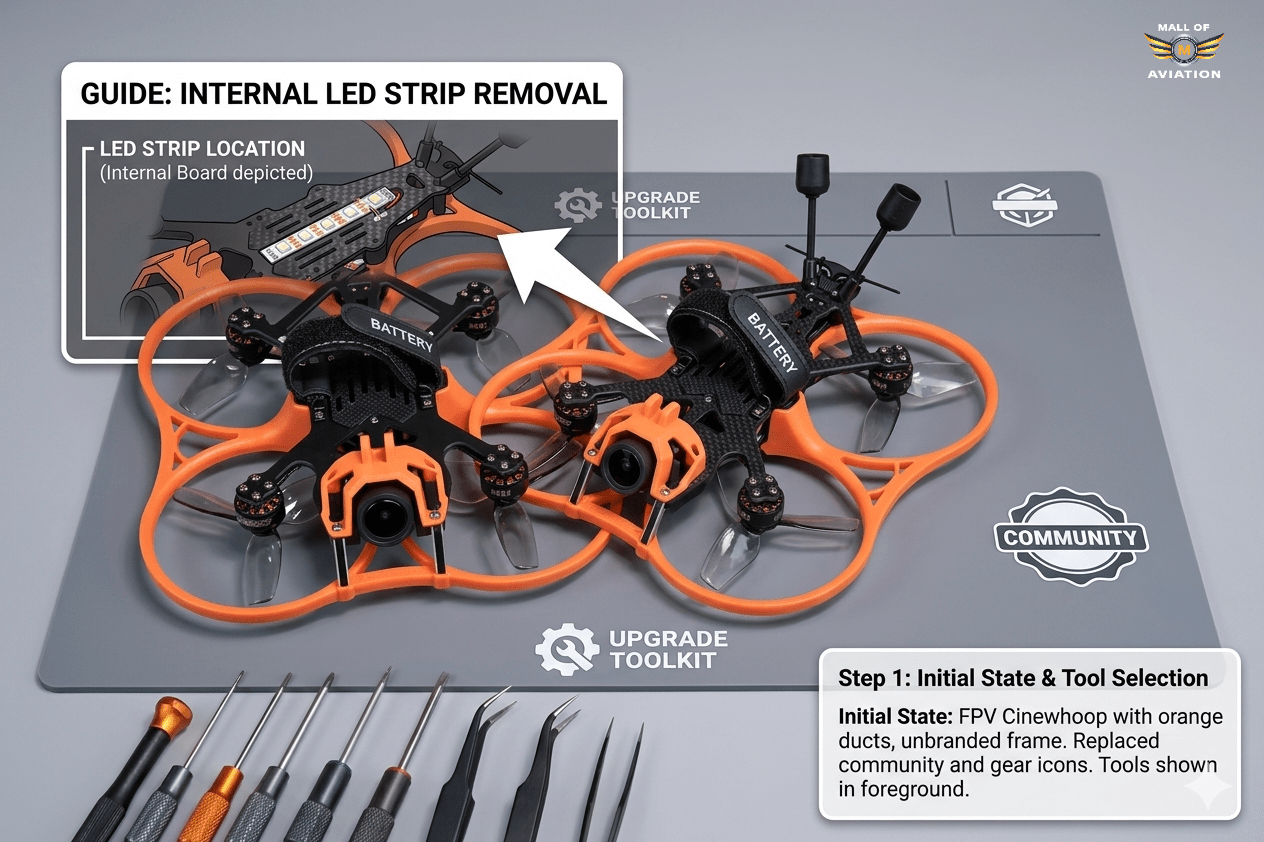
Step-by-Step LED Removal Process
- Disconnect and remove the battery before beginning any work on the drone. Never work on electronics with the battery connected.
- Locate the LED connector — on the Cinelog30 V3, the LED connector is typically a small JST connector on the underside of the frame, near the front or side. It connects the prop guard LED wiring to the flight controller stack.
- Carefully unplug the LED connector from the flight controller. Use tweezers to grip the connector body — never pull on the wires directly as this can damage the solder joint on the FC pad.
- Remove the LED-equipped prop guards by unscrewing the mounting screws on each arm. Keep these prop guards stored safely — you may want them for night flying in future sessions.
- Install the non-LED black prop guards from the included accessories. These mount identically to the LED guards using the same screw positions.
- Tuck and secure the disconnected LED cable neatly against the frame using a small tie-wrap or double-sided foam tape. Do not cut the cable — keeping it attached means the LED guards can be reinstalled in the future if needed.
- Verify all prop guard screws are tight before proceeding to software configuration.
Betaflight LED and Mode Cleanup After You Upgrade GEPRC Cinelog30 V3
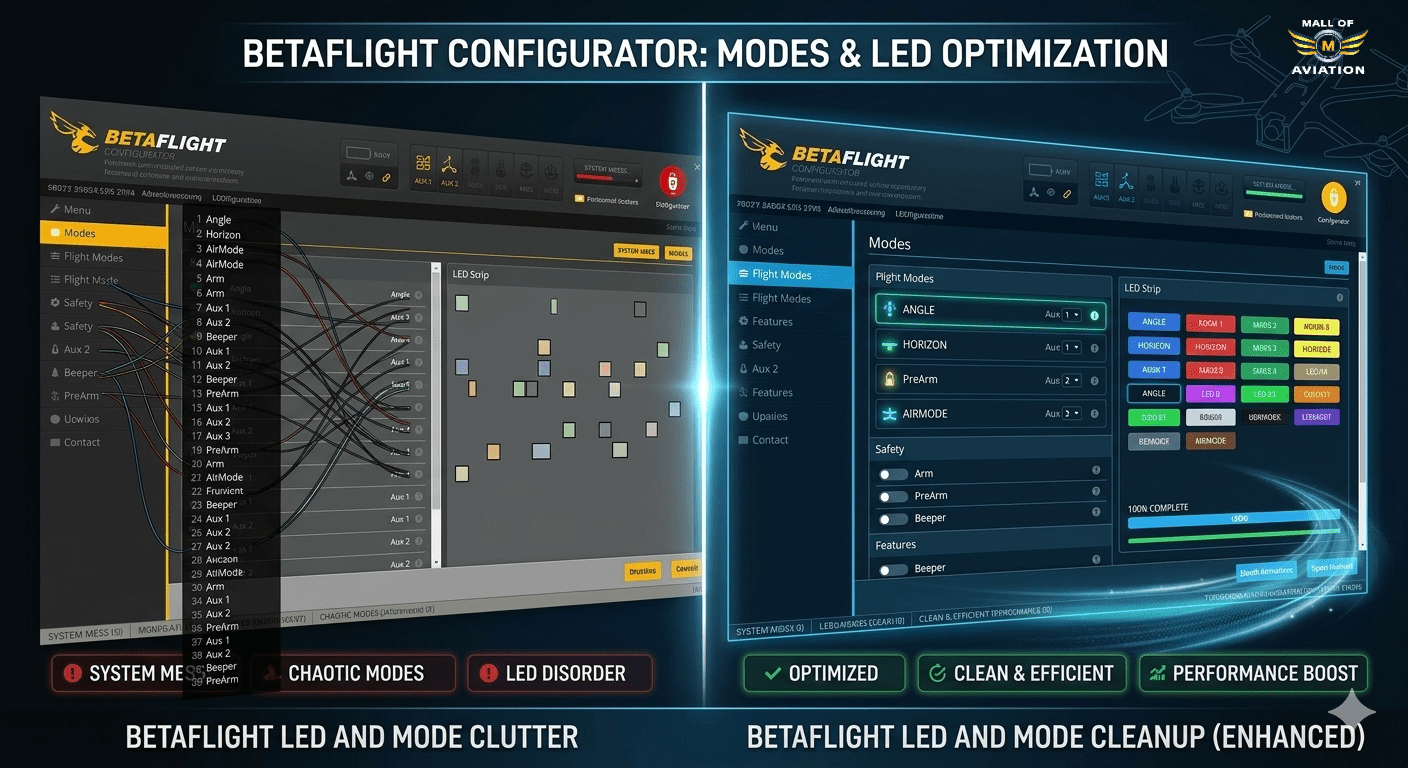
After physically removing the LED connection as part of your effort to upgrade GEPRC Cinelog30 V3, there are important corresponding changes to make in Betaflight that complete the LED removal process and free up resources for your GPS installation.
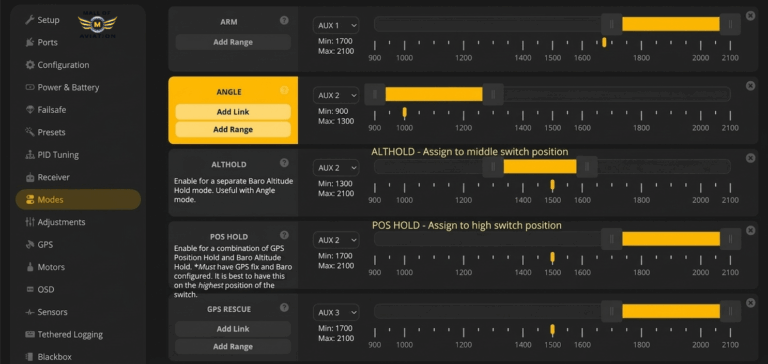
In Betaflight Configurator, navigate to the Modes tab. You will likely see a mode assignment using USER1 (or a similar label) that was configured to control the LED strip via an AUX channel. Since the LEDs are now disconnected, this mode assignment serves no purpose and its AUX channel assignment can be repurposed for GPS Rescue.
- Open Betaflight Configurator and connect your flight controller.
- Navigate to the Modes tab.
- Find the USER1 or LED Strip mode and delete its AUX channel assignment by clicking the trash icon or removing the range.
- Save the changes.
- This AUX channel is now free to be assigned to GPS Rescue activation, which we configure in a later step.
Additionally, navigate to the LED Strip tab and ensure the LED strip feature is disabled entirely. This prevents Betaflight from wasting CPU cycles managing a disconnected LED system, freeing resources for GPS processing and other flight-critical tasks.
Choosing the Right GPS Module to Upgrade GEPRC Cinelog30 V3
The GPS module you choose has a significant impact on GPS Rescue performance and the weight impact on your build when you upgrade GEPRC Cinelog30 V3. For a compact, weight-sensitive platform like the Cinelog30 V3, you need something small, light, reliable, and fast to acquire satellite fixes.
After extensive real-world testing in the Cinelog30 V3 community, the Flywoo GOKU Nano GPS V3 has emerged as the top recommendation for this platform. According to reviews on Oscar Liang’s comprehensive FPV GPS guide, compact multi-constellation modules like the GOKU Nano V3 are specifically recommended for weight-sensitive sub-250g builds:
- Ultra-compact form factor: At approximately 14mm x 14mm, it is one of the smallest functional GPS modules available. It fits the Cinelog30 V3’s cramped frame geometry without requiring excessive modification.
- Integrated compass: The GOKU Nano V3 includes a built-in compass (magnetometer) in the same module. This eliminates the need for a separate compass module and saves additional weight and wiring complexity.
- Multi-constellation support: Supports GPS, GLONASS, Galileo, and BeiDou satellite constellations simultaneously, providing faster cold-start lock times and higher satellite counts compared to GPS-only modules.
- Low weight: At approximately 3.2 grams including cable, it is one of the lightest GPS options available — critical for a sub-250g build where the GPS addition must be partially offset by LED weight savings.
- Betaflight compatibility: Fully compatible with Betaflight’s GPS and GPS Rescue features. Recognized immediately as a UBLOX protocol device without requiring custom configuration.
Alternative options include the BetaFPV M8N GPS (slightly larger but excellent satellite acquisition) and the Matek M8Q-5883 (integrated compass, good performance, slightly heavier). For the Cinelog30 V3 specifically, the GOKU Nano V3 remains the first choice due to its exceptional size-to-performance ratio.
GPS Mounting Solutions When You Upgrade GEPRC Cinelog30 V3
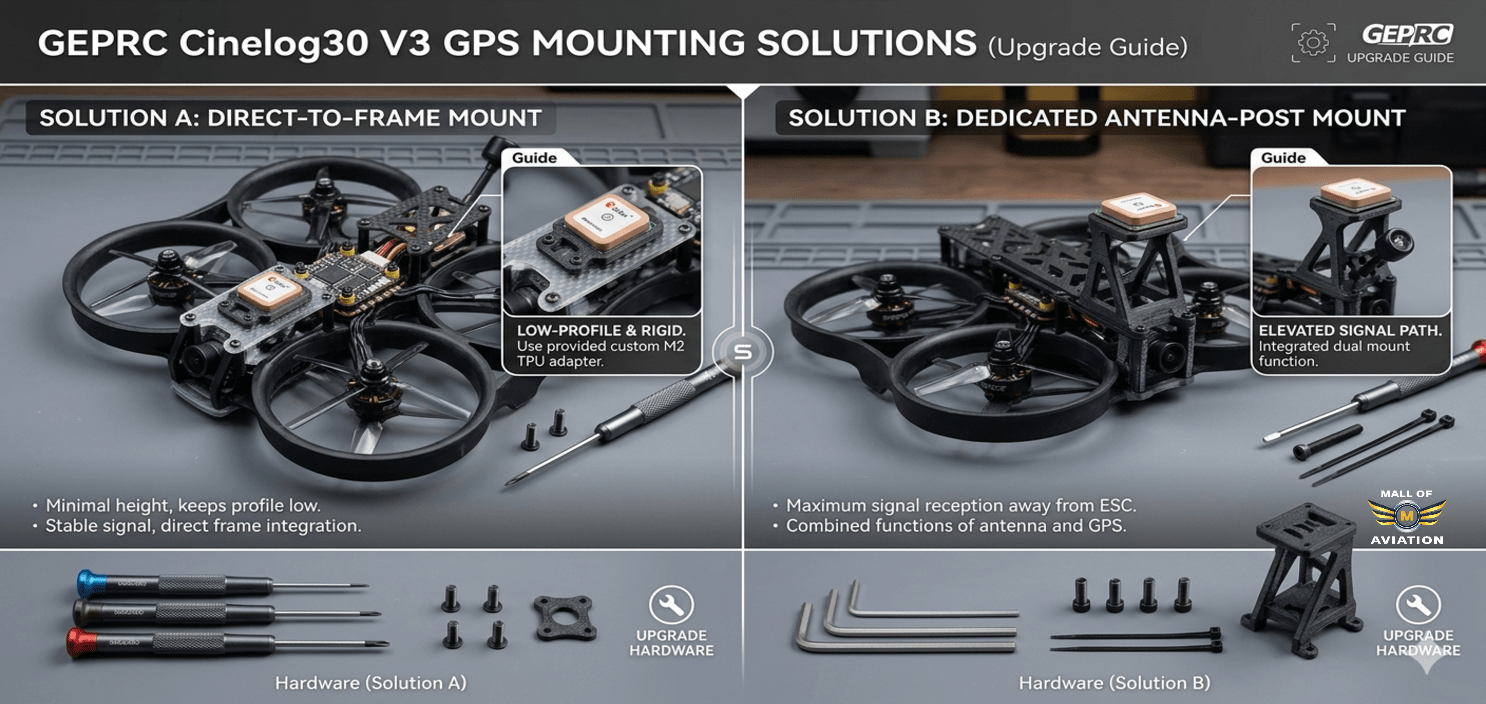
The Cinelog30 V3’s compact frame presents a real challenge for GPS mounting when you upgrade GEPRC Cinelog30 V3. Unlike larger drones with dedicated GPS mast mount points, the Cinelog30 V3 has limited flat surface area not already occupied by the prop guards, battery strap, or camera mount. Several mounting approaches have been tested by the community:
Option 1 — GoPro Mount Replacement (Most Popular Upgrade GEPRC Cinelog30 V3 Method)
The most widely used solution replaces the standard GoPro mount arm with a custom 3D-printed bracket that incorporates a GPS mounting position alongside or above the camera. This keeps the GPS elevated above the main electronics stack — improving sky visibility and satellite acquisition — while maintaining the ability to attach a GoPro or similar camera. Several community-designed mounts are available for free download on Printables.com and Thingiverse specifically for the Cinelog30 V3 geometry.
Option 2 — Top Stack Mount
A small 3D-printed platform that attaches to the top of the frame stack using the existing standoff holes. The GPS module sits on this platform, elevated above the electronics. This approach keeps the GPS centered over the drone’s center of gravity — beneficial for compass accuracy. The downside is that it requires sourcing or printing the mount and may add a few millimeters of height to the overall profile.
Option 3 — Adhesive Mount
For pilots who want the simplest possible installation when they upgrade GEPRC Cinelog30 V3, the GPS module can be attached to the top surface of the drone using double-sided foam tape, positioned as far forward and as high as possible on the frame. This approach has no 3D printing requirement but provides less secure mounting and is more susceptible to vibration-induced GPS performance issues.
Regardless of which mounting approach you choose, observe these universal rules for GPS placement when you upgrade GEPRC Cinelog30 V3:
- Keep the GPS at least 20–30mm away from the VTX antenna to minimize RF interference
- Ensure the GPS module faces upward with a clear, unobstructed view of the sky
- The GPS cable should not be taut — leave a small loop of slack to prevent connector stress from vibration
- Secure the GPS module firmly — a GPS that moves during flight introduces compass heading errors
Wiring GPS to the Flight Controller — Upgrade GEPRC Cinelog30 V3 Guide
When you upgrade GEPRC Cinelog30 V3 with GPS, the module connects to the flight controller via a standard UART connection. The wiring is straightforward but must be done carefully to ensure reliable signal transmission.
Standard GPS Wiring Connections:
- GPS TX → FC RX (GPS transmits data, FC receives it)
- GPS RX → FC TX (FC transmits commands, GPS receives them)
- GPS 5V → FC 5V pad (power supply for GPS module)
- GPS GND → FC GND (common ground)
For the Cinelog30 V3, UART4 is recommended as the GPS UART assignment. This is typically the most accessible available UART on the specific flight controller used in this drone, and it does not conflict with any stock peripheral assignments (receiver is usually on UART1 or UART2, ESC telemetry on UART3).
Wiring Best Practices When You Upgrade GEPRC Cinelog30 V3
- Use the thinnest suitable gauge wire: GPS signal wires carry minimal current. Using thin 28–30AWG wire saves weight and is easier to route through the tight frame geometry.
- Keep wire runs as short as possible: Measure the distance from your GPS mounting position to the FC UART pads and cut wires to length before soldering. Excess wire adds weight and creates potential for vibration-induced shorts.
- Tin both wire ends and pads before soldering: Pre-tinning makes the final joint faster and reduces the amount of heat applied to sensitive FC components.
- Insulate individual solder joints: Use small heat shrink pieces to cover each solder joint on the GPS cable, preventing any possibility of shorts from adjacent pads or the frame.
- Verify connections before powering up: Use a multimeter to confirm continuity on all four connections and verify there are no shorts between TX/RX, power, and ground before connecting the battery for the first time.
Compass Setup — Advanced I2C Remapping to Upgrade GEPRC Cinelog30 V3
One of the more advanced steps when you upgrade GEPRC Cinelog30 V3 is enabling the compass through I2C remapping. The standard Cinelog30 V3 flight controller does not expose I2C ports in a conventional configuration — the I2C SDA and SCL lines are mapped to the same physical pins as UART3 TX and RX. To use the compass on your GPS module, you need to remap these resources in Betaflight’s CLI.
This modification unlocks the full potential of the GPS module’s integrated compass — enabling more accurate heading information and opening the door to future Betaflight features like Position Hold. As noted in the Betaflight GPS Rescue wiki, compass accuracy is a key factor in reliable GPS Rescue navigation.
CLI Commands for I2C Remapping
Connect to Betaflight Configurator, open the CLI tab, and enter the following commands exactly as shown:
resource SERIAL_RX 3 none
resource I2C_SDA 2 B11
resource SERIAL_TX 3 none
resource I2C_SCL 2 B10
save
What these commands do when you upgrade GEPRC Cinelog30 V3:
- resource SERIAL_RX 3 none — releases pin B11 from UART3 RX function
- resource I2C_SDA 2 B11 — assigns pin B11 to I2C2 SDA function (compass data line)
- resource SERIAL_TX 3 none — releases pin B10 from UART3 TX function
- resource I2C_SCL 2 B10 — assigns pin B10 to I2C2 SCL function (compass clock line)
After the save and reboot, the compass on your GPS module will be accessible to Betaflight via I2C2. Enable the compass in the Configuration tab and perform a compass calibration before flying.
Betaflight GPS Configuration — Complete Upgrade GEPRC Cinelog30 V3 Setup
After wiring the GPS module and completing any desired CLI remapping as part of your effort to upgrade GEPRC Cinelog30 V3, the next step is configuring Betaflight to recognize and use the GPS hardware through the Ports and Configuration tabs.
Ports Tab Configuration
- Open Betaflight Configurator and connect your flight controller.
- Navigate to the Ports tab.
- Find the UART row corresponding to the UART you wired your GPS to (UART4 in the recommended setup).
- In the Sensor Input column for that UART row, select GPS from the dropdown menu.
- Leave the baud rate at Auto — Betaflight will automatically negotiate the correct baud rate with most modern GPS modules including the Flywoo GOKU Nano V3.
- Click Save and Reboot.
Configuration Tab GPS Settings for Upgrade GEPRC Cinelog30 V3
- After reboot, navigate to the Configuration tab.
- Scroll to the GPS section.
- Enable GPS by toggling the master switch ON.
- Set Protocol to UBLOX — the correct protocol for the Flywoo GOKU Nano V3 and most modern GPS modules.
- Set Ground Assistance Type to Auto Detect for automatic satellite constellation configuration.
- Enable GPS for Rescue — this ensures GPS data is available for GPS Rescue mode activation.
- If you completed the compass remapping, also enable Magnetometer and select the correct compass device from the dropdown (typically HMC5883 or QMC5883 depending on the specific chip in your GPS module).
- Click Save and Reboot.
Verifying GPS Function After You Upgrade GEPRC Cinelog30 V3
After saving the configuration, take your drone to an open outdoor area and power it on. In Betaflight’s GPS tab (or OSD if configured), you should see:
- GPS fix status changing from “No Fix” to “3D Fix” within 30–90 seconds of outdoor exposure
- Satellite count climbing to 10 or higher under open sky conditions
- Latitude and longitude values updating in real time
- HDOP (Horizontal Dilution of Precision) value below 2.0 — lower is better, indicating more accurate position data
If satellite count remains low or fix is not achieved, check that the GPS is physically positioned with a clear sky view and that the UART assignment matches the physical wiring.
GPS Rescue Mode — Setup and Testing After You Upgrade GEPRC Cinelog30 V3
GPS Rescue mode is the primary reason most pilots choose to upgrade GEPRC Cinelog30 V3 with a GPS module. When activated — either manually or automatically when signal is lost as a failsafe — GPS Rescue commands the drone to climb to a preset safe altitude, orient toward the recorded home position, fly back autonomously, and perform a controlled landing.
GPS Rescue Configuration in Betaflight
- Navigate to the Failsafe tab in Betaflight Configurator.
- In the Stage 2 Failsafe section, set Failsafe Procedure to GPS Rescue.
- Configure the following GPS Rescue parameters:
- Min Sats: Set to 8 minimum. GPS Rescue will not activate below this satellite count — it will fall back to Drop instead.
- Rescue Altitude: Set to at least 15–20 meters for indoor/urban flying, higher if flying near trees or tall obstacles.
- Return Speed: 3–5 m/s is appropriate for the Cinelog30 V3’s size and power level.
- Descent Speed: 1.5–2 m/s for a controlled, gentle landing approach.
- Landing Alt: Set to 5 meters — the altitude at which the drone transitions from horizontal navigation to final descent.
- Navigate to the Modes tab and assign GPS Rescue to an AUX switch on your radio — the same AUX channel you freed up by removing the LED mode assignment.
- Click Save and Reboot.
Safe GPS Rescue Testing Procedure
Never rely on GPS Rescue for the first time in a critical situation without first verifying it works correctly at close range. Here is the correct testing sequence:
- Choose a large open outdoor area with at least 50 meters of clear space in all directions.
- Power on the drone and wait for a solid GPS fix with at least 10 satellites before arming. The home position is recorded at the moment of arming.
- Arm and hover the drone at approximately 3–5 meters altitude, directly in front of you.
- Activate GPS Rescue using your assigned switch. Observe the drone’s behavior — it should climb to your configured rescue altitude, orient toward home, and begin flying back.
- As it approaches your position, deactivate the switch to resume manual control before it gets too close.
- Repeat this test at progressively greater distances — 20 meters, 50 meters, 100 meters — before relying on GPS Rescue in real flying scenarios.
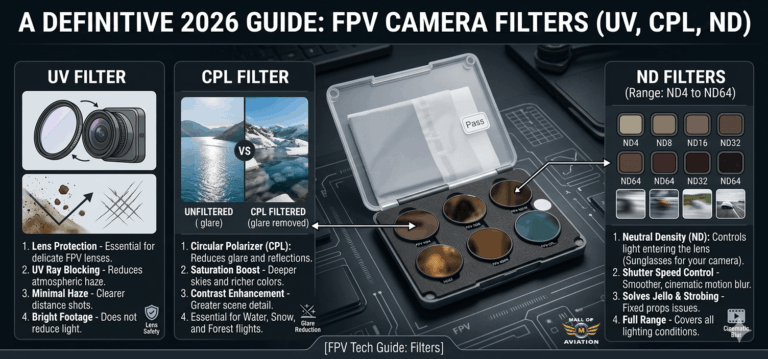
ND Filters for Cinematic Footage After You Upgrade GEPRC Cinelog30 V3
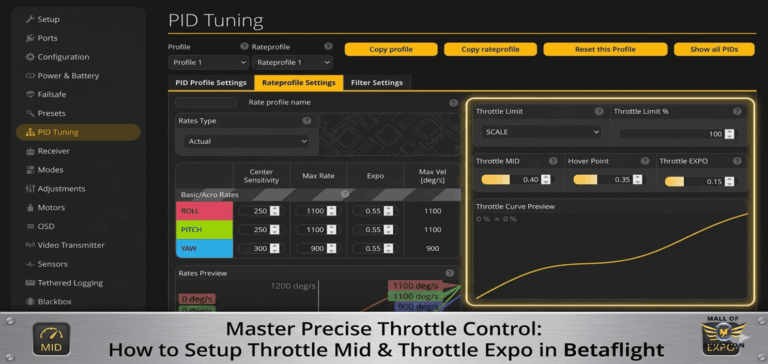
For pilots who upgrade GEPRC Cinelog30 V3 as a serious cinematic tool, ND (Neutral Density) filters are one of the most impactful accessories for video quality. The 180-degree shutter rule states that for natural-looking motion blur, your shutter speed should be approximately twice your frame rate — 1/60 second at 30fps, 1/120 second at 60fps.
In bright outdoor conditions without ND filters, the camera is forced into very fast shutter speeds to avoid overexposure, producing footage that looks sharp and choppy in motion rather than smooth and cinematic. ND filters allow you to use the correct shutter speed for natural motion blur in any lighting condition. For a deep understanding of ND filter selection, B&H Photo’s ND filter guide provides an excellent technical reference.
For the DJI O4 Pro system on the Cinelog30 V3, use low-profile ND filters in strengths suited to different lighting conditions:
- ND8: Overcast days, dawn and dusk, golden hour shooting
- ND16: Partly cloudy conditions, bright but diffused light
- ND32: Direct sunlight, typical midday outdoor shooting
- ND64: Very bright sunny days, highly reflective surfaces like snow or water
Start with an ND16 and ND32 as your core kit — these two filters cover the majority of typical outdoor cinematic shooting scenarios for the upgraded Cinelog30 V3.
PID Tuning Considerations After You Upgrade GEPRC Cinelog30 V3
After completing the hardware modifications when you upgrade GEPRC Cinelog30 V3 — particularly the GPS addition and LED guard swap — it is worth taking a fresh look at your PID tune. Adding a GPS module changes the weight distribution of the drone and introduces additional mass at a specific location on the frame.
For a cinewhoop application, the key tuning priorities after you upgrade GEPRC Cinelog30 V3 are:
- Smooth, linear roll and pitch responses: Cinematic footage benefits from motion that feels deliberate and graceful. Sharp, snappy PID responses produce footage that looks twitchy and amateurish.
- Minimal oscillations in hover: Micro-oscillations during hover are clearly visible in smooth, stable cinematic shots. Running Blackbox logging during a hover session helps identify any oscillation frequencies that filtering adjustments can address.
- RPM filtering if supported: Enable Bidirectional DSHOT and RPM filtering if your ESCs support it. This dramatically reduces motor noise in the gyro signal, allowing cleaner filter settings and smoother flight overall.
Real-World Performance Improvements When You Upgrade GEPRC Cinelog30 V3
After applying all the modifications described in this upgrade GEPRC Cinelog30 V3 guide, here is what you can realistically expect:
- Weight reduction: Swapping LED guards saves approximately 4 grams. Combined with cable management and hardware optimization, total savings of 5–8 grams are achievable — partially or fully offsetting the GPS module weight of 3–4 grams.
- Flight time improvement: The net weight reduction combined with slightly lower average power draw from removed LED electronics typically yields 15–30 seconds of additional flight time per battery. On a sub-250g cinewhoop, this represents a meaningful percentage improvement per flight.
- Safety improvement: GPS Rescue mode transforms the safety profile of this drone for outdoor use. Signal loss events that would previously result in a crashed or lost drone now result in an autonomous return-to-home — the single most impactful safety upgrade available when you upgrade GEPRC Cinelog30 V3.
- Footage quality: With properly selected ND filters enabling the 180-degree shutter rule compliance, the visual quality improvement in bright outdoor footage is immediately obvious — footage transitions from sharp and choppy to smooth and cinematic.
- Operational capability: A GPS-equipped, compass-configured Cinelog30 V3 is a fundamentally more capable platform than the stock unit, allowing you to fly in more diverse environments with greater confidence.
Upgrade GEPRC Cinelog30 V3 — Priority Guide
If you are not ready to apply all modifications simultaneously when you upgrade GEPRC Cinelog30 V3, here is the recommended priority order based on impact per effort invested:
- Priority 1 — LED Guard Swap: Highest impact-to-effort ratio of any modification. Takes 10 minutes, requires no soldering, saves weight, and frees an AUX channel. Do this first when you upgrade GEPRC Cinelog30 V3.
- Priority 2 — GPS Installation and Betaflight Configuration: The most significant safety and capability upgrade. Requires soldering and software configuration — budget 1–2 hours for a clean, careful installation.
- Priority 3 — GPS Rescue Setup and Testing: Directly follows GPS installation. The configuration takes 30 minutes; testing takes as long as needed to feel confident in the system’s behavior.
- Priority 4 — ND Filter Kit: Immediate, dramatic footage quality improvement. No installation required — simply attach to the camera. Start with ND16 and ND32.
- Priority 5 — Compass Remapping and PID Retune: Advanced modifications for pilots who want maximum capability. Budget several hours for CLI work, compass calibration, and Blackbox-guided PID tuning.
Common Mistakes to Avoid When You Upgrade GEPRC Cinelog30 V3
- Incorrect UART assignment for GPS: Always verify that the UART you assign in Betaflight’s Ports tab physically matches the UART pads you soldered the GPS wiring to. A mismatch means the GPS will never communicate with the flight controller.
- Loose GPS wiring: The Cinelog30 V3 vibrates significantly during high-throttle maneuvers. Any GPS cable connection that is not fully seated and physically secure can work loose over time. Inspect GPS connector seating after every crash.
- Arming without GPS fix: Never arm for a flight that relies on GPS Rescue before confirming a solid GPS fix with adequate satellite count. The home position is recorded at arm time — if you arm without a fix, GPS Rescue will not have valid home coordinates to navigate toward.
- Not testing GPS Rescue before relying on it: GPS Rescue that has never been tested in a controlled scenario is not a reliable safety net. Always complete the graduated testing procedure before trusting GPS Rescue in real flying situations.
- GPS module too close to the VTX antenna: RF interference from the video transmitter can significantly degrade GPS signal quality, reducing satellite count and increasing fix times. Maintain at least 20–30mm of separation between the GPS module and VTX antenna.
- Skipping compass calibration after installation: An uncalibrated compass provides incorrect heading information to GPS Rescue — potentially causing the drone to fly in the wrong direction during a rescue event. Always perform compass calibration after initial installation.
- Applying I2C remapping without verifying UART3 is unused: The I2C remapping CLI commands free UART3 pins for compass use. If UART3 is currently used for a peripheral, remapping it will break that peripheral. Always check your Ports tab configuration before applying the remapping commands.
Final Thoughts — Why You Should Upgrade GEPRC Cinelog30 V3
The decision to upgrade GEPRC Cinelog30 V3 is one of the best investments you can make as a serious cinematic FPV pilot. The Cinelog30 V3 is already one of the most accomplished sub-250g cinematic drones available in 2026 — its combination of DJI O4 Pro video quality, stable ducted flight characteristics, and compact form factor makes it genuinely competitive with much more expensive platforms for most cinematic use cases.
But the modifications covered in this upgrade GEPRC Cinelog30 V3 guide take it significantly further — adding the safety features, operational flexibility, and video quality refinements that transform it from a capable consumer product into a professional tool. The LED guard swap delivers immediate, effortless weight savings. The GPS installation opens an entirely new dimension of safety and capability. The ND filter upgrade fundamentally changes the visual quality of outdoor footage. And the advanced compass remapping and PID tuning refinements squeeze every last percentage of performance from this remarkable little platform.
Apply these modifications thoughtfully, test each system carefully before relying on it in the field, and you will have an upgraded GEPRC Cinelog30 V3 that is genuinely in a different class from the stock unit — safer, more capable, more efficient, and more creatively powerful in every scenario you fly it.
Mall of Aviation stocks GPS modules, ND filter kits, prop guards, and all the hardware and accessories you need to upgrade GEPRC Cinelog30 V3. Visit our store for expert guidance and the best FPV equipment available in India.
Frequently Asked Questions — Upgrade GEPRC Cinelog30 V3
Is GPS necessary when I upgrade GEPRC Cinelog30 V3?
GPS is not required for basic flying, but it is highly recommended for any pilot who flies outdoors, at any distance from themselves, or in environments where losing the drone would be difficult or costly. GPS Rescue mode — which requires a GPS module — provides automatic return-to-home capability if signal is lost. When you upgrade GEPRC Cinelog30 V3 for serious cinematic flying, GPS is effectively essential safety equipment.
How much weight does the LED guard swap save when I upgrade GEPRC Cinelog30 V3?
Swapping from the LED-equipped prop guards to the standard black guards saves approximately 4 grams of total system weight. Additionally, disconnecting the LED power lead eliminates a small parasitic power draw from the flight controller. While 4 grams sounds minor, on a sub-250g platform it represents nearly 2% of total flying weight — enough to partially offset the GPS module addition and contribute meaningfully to hover efficiency and flight time.
What is the best GPS module when I upgrade GEPRC Cinelog30 V3?
The Flywoo GOKU Nano GPS V3 is the top recommendation for this platform due to its ultra-compact 14x14mm form factor, integrated compass, multi-constellation satellite support (GPS/GLONASS/Galileo/BeiDou), and very low weight of approximately 3.2 grams including cable. It fits the Cinelog30 V3’s tight geometry well and performs reliably with Betaflight’s GPS Rescue system. The BetaFPV M8N GPS is a good alternative if the GOKU Nano is unavailable.
Can I add a compass when I upgrade GEPRC Cinelog30 V3?
Yes, but it requires remapping I2C resources in Betaflight’s CLI. The stock flight controller maps UART3 TX/RX to pins that can be reassigned as I2C SDA/SCL, enabling compass connectivity via I2C2. The specific CLI commands are provided in the Compass Setup section of this upgrade GEPRC Cinelog30 V3 guide. This remapping disables UART3, so verify it is not in use before applying. After remapping, enable the magnetometer in Betaflight’s Configuration tab and perform a compass calibration before flying.
Is GPS Rescue reliable after I upgrade GEPRC Cinelog30 V3?
Yes — GPS Rescue on the Cinelog30 V3 is highly reliable when properly configured and tested. The key requirements are: adequate satellite count (10+ satellites recommended) before arming, GPS Rescue altitude set well above local obstacles, correct compass calibration, and thorough graduated testing before relying on it in real scenarios. Pilots who have completed the full upgrade GEPRC Cinelog30 V3 setup and testing procedure consistently report GPS Rescue performing reliably as a last-resort safety system.
Do I need to configure Betaflight after I upgrade GEPRC Cinelog30 V3 with GPS?
Yes — GPS hardware installation alone is not sufficient when you upgrade GEPRC Cinelog30 V3. You must also configure the correct UART assignment in Betaflight’s Ports tab, enable GPS and set the protocol to UBLOX in the Configuration tab, and configure GPS Rescue parameters in the Failsafe tab. Without this software configuration, Betaflight will not recognize the GPS module regardless of how correctly it is wired.
Will these modifications affect the Cinelog30 V3’s warranty?
Any hardware modification — including GPS installation, LED guard replacement, and soldering — will likely affect the manufacturer’s warranty for the components involved. GEPRC’s warranty typically covers manufacturing defects, not user modifications. Before you upgrade GEPRC Cinelog30 V3, check the current warranty terms on GEPRC’s official website and consider whether warranty coverage is important for your situation. For pilots who are comfortable with the technical work, the performance benefits generally outweigh the warranty consideration.
Are ND filters necessary when I upgrade GEPRC Cinelog30 V3?
ND filters are not necessary for casual flying, but they are strongly recommended for serious cinematic work. Without ND filters, achieving the 180-degree shutter rule in bright outdoor conditions is impossible — the camera must use a fast shutter speed to avoid overexposure, producing footage with unnatural motion characteristics. For any pilot whose primary goal after upgrading GEPRC Cinelog30 V3 is professional-quality cinematic footage, an ND filter kit (ND16 and ND32 at minimum) is one of the highest-return-on-investment accessories available.
Can beginners upgrade GEPRC Cinelog30 V3 with these modifications?
The LED guard swap requires no tools beyond a small screwdriver and is suitable for complete beginners. The Betaflight software configuration changes require familiarity with Betaflight Configurator but no hardware skills. The GPS installation requires basic soldering skills. The advanced compass remapping requires CLI confidence but no soldering. We recommend beginners start with the LED swap and Betaflight cleanup, then attempt GPS installation after watching a soldering tutorial and practicing on scrap boards before attempting the full upgrade GEPRC Cinelog30 V3 process.
Will the GPS addition push the Cinelog30 V3 over 250g when I upgrade GEPRC Cinelog30 V3?
This depends on your specific configuration. The Flywoo GOKU Nano GPS V3 weighs approximately 3.2 grams. The LED guard swap saves approximately 4 grams. Net impact when you upgrade GEPRC Cinelog30 V3 is therefore approximately -0.8 grams — meaning the GPS addition combined with LED removal actually reduces total weight slightly. However, all-up weight varies significantly based on battery choice, camera model, and mounting hardware. Always weigh your complete flying configuration after you upgrade GEPRC Cinelog30 V3 to verify your actual all-up weight before making any regulatory compliance claims.