How to Build an FPV Drone
How to Build an FPV Drone (DJI O4 Pro Air Unit) – Complete Beginner to Advanced Guide (2026)
Step-by-Step FPV Build Tutorial • Mall of Aviation
Quick Overview: Want to know how to build an FPV drone from scratch? This complete guide walks you through building a powerful 5-inch FPV drone using the DJI O4 Pro Air Unit. From choosing parts to wiring, Betaflight setup, tuning, and flying — everything is covered in complete detail for both beginners and advanced builders.
How to build an FPV drone is one of the most searched questions in the FPV hobby — and for good reason. Building your own FPV drone from scratch gives you complete control over performance, repairability, and customization. Every component you choose, every wire you solder, and every setting you configure is tailored to exactly how you want to fly. If you have been wondering how to build an FPV drone but don’t know where to start, this guide covers every single step from parts selection all the way to your first flight.
Understanding how to build an FPV drone also makes you a dramatically better pilot. When you know exactly how your drone is constructed, you can diagnose problems faster, repair crash damage with confidence, and upgrade individual parts as your skills and preferences evolve. Pilots who learn how to build an FPV drone develop a deeper understanding of flight dynamics, power systems, and electronics that pre-built drone owners simply never acquire.
This complete guide by Mall of Aviation is designed to take you from absolute beginner to confident builder. Even if you have never soldered before, you will be able to follow along and successfully complete your own custom build. We cover every single step — parts selection, tools, frame assembly, motor installation, wiring, ESC setup, DJI O4 Pro Air Unit installation, Betaflight configuration, tuning, and first flight preparation.
Table of Contents
- Can Beginners Learn How to Build an FPV Drone?
- Mastering the Basics Before You Build
- Full Parts List: How to Build an FPV Drone
- Tools & Supplies You Will Need
- Step-by-Step: How to Build an FPV Drone
- Step 1: Frame Assembly
- Step 2: Installing Motors
- Step 3: Wiring Diagram & Planning
- Step 4: Installing the ESC Stack
- Step 5: Testing ESC & Motors
- Step 6: Receiver Setup & Binding
- Step 7: Installing DJI O4 Pro Air Unit
- Step 8: Finishing the Build
- Step 9: Betaflight Setup & Configuration
- Step 10: Tuning Your FPV Drone
- Step 11: Learning to Fly Your FPV Drone
- FAQ — How to Build an FPV Drone
Can Beginners Learn How to Build an FPV Drone?
Yes — absolutely. Learning how to build an FPV drone might look intimidating at first glance, but beginners can definitely complete a successful build with patience, preparation, and the right guidance. The FPV community is famously welcoming, and the body of tutorials, documentation, and community support available in 2026 makes it easier than ever to learn how to build an FPV drone from scratch.
The key difference between buying a pre-built drone and learning how to build an FPV drone yourself is the depth of knowledge you gain. When you build your own machine, you are not just a pilot — you become a technician, an engineer, and a problem-solver. You learn how every component interacts with every other component. You understand why certain settings exist, why specific components are chosen over others, and how to methodically diagnose and fix any issue that arises.
Instead of just flying, learning how to build an FPV drone teaches you:
- How every component works and why it was designed that way
- How to troubleshoot electronic, firmware, and mechanical problems systematically
- How to repair crash damage quickly and cost-effectively in the field
- How to upgrade and customize your drone as your skills and preferences develop
- How to tune flight performance to match your specific flying style
- How to select better components as you gain experience
Your first build may take anywhere from a single long day to several days spread across a week — but the knowledge you gain is invaluable and will serve you for the entire duration of your time in the FPV hobby. Many experienced pilots look back on their first build as the single most important learning experience of their FPV journey. Do not rush it — enjoy the process.
For additional background on the FPV hobby before you begin, Oscar Liang’s comprehensive FPV drone guide is one of the most respected resources in the community and an excellent starting point for newcomers.
Mastering the Basics Before You Learn How to Build an FPV Drone
Before jumping straight into your build, it is helpful to spend a little time understanding the fundamental concepts behind how FPV drones work. You do not need to be an expert before you start — the build process itself will teach you most of what you need to know — but having a basic mental model of the system makes each step significantly easier to follow and understand.
Here are the core concepts every builder should understand before learning how to build an FPV drone:
- Flight Controller (FC): The brain of the drone. The FC runs Betaflight firmware, reads sensor data from the gyroscope and accelerometer, processes your radio input, and sends precise signals to the motors to maintain stable, controlled flight.
- ESC (Electronic Speed Controller): The ESC translates the digital motor commands from the flight controller into the precise power delivery needed to spin each motor at the correct speed. Modern FPV drones typically use a 4-in-1 ESC stack that controls all four motors from a single board, simplifying wiring and reducing weight.
- Motors: Brushless motors convert electrical power from the battery into the rotational mechanical force that spins your propellers. Motor selection — specifically KV rating, stator size, and efficiency — has a major impact on the flight characteristics of your build.
- FPV System: The video transmission system that sends a real-time camera feed from your drone to your goggles. The DJI O4 Pro Air Unit used in this build is a digital HD video system that delivers exceptional image quality and long range compared to analog alternatives.
- Radio Control System: The link between your transmitter (radio controller) and your drone. This build uses ExpressLRS (ELRS), an open-source radio protocol renowned for its ultra-low latency and exceptional range.
- Battery: LiPo (Lithium Polymer) batteries power FPV drones. Battery cell count (voltage), capacity, and C-rating determine how much power is available and how the drone performs under load.
Don’t worry if these terms are entirely new — you will learn them deeply during the build process and they will become second nature within your first few sessions.
Full Parts List: How to Build an FPV Drone (DJI O4 Pro 5-Inch Build)
Recommended Complete Build (DJI O4 Pro, 5-inch):
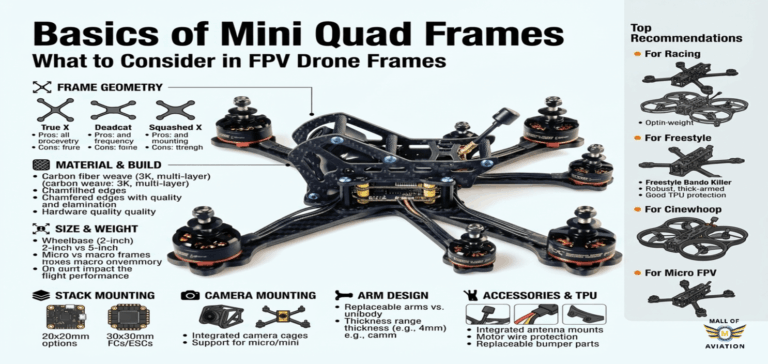
- Frame: GEPRC Vapor X5 — excellent crash durability, clean stack mounting, and good internal cable routing
- FC/ESC Stack: Speedybee F405 V4 + 60A 4-in-1 ESC — reliable, well-supported in Betaflight, and excellent feature set for the price
- Motors: EMAX ECO II 2207 1900KV — proven performer for 5-inch 6S builds, efficient and durable
- Propellers: HQ 5×4.3×3 Tri-Blade — excellent balance of thrust, efficiency, and smoothness
- Receiver: BetaFPV ELRS Nano — compact, lightweight, excellent range and latency
- FPV System: DJI O4 Pro Air Unit — the best digital HD FPV system available for 5-inch builds in 2026
- Battery: 6S 1000–1300mAh LiPo (45C or higher recommended)
- Capacitor: 1000μF 35V low-ESR electrolytic — filters voltage spikes and protects ESC
- XT60 Connector: Male XT60 for battery lead
- Heat shrink tubing: Various sizes for wire insulation and protection
When selecting parts to learn how to build an FPV drone, prioritize components with strong community support and active Betaflight integration. This ensures you will always find setup guides, configuration files, and troubleshooting help when you need it. The parts list above represents one of the most well-tested and community-supported combinations available in 2026.
For detailed reviews and comparisons of flight controllers and ESC stacks, RCGroups’ FPV forum is one of the most active communities for real-world hardware feedback from experienced builders worldwide. You can also browse our complete FPV drone parts buyer’s guide for in-depth reviews of every component category.
Tools & Supplies You Will Need to Build an FPV Drone
Having the right tools before you begin learning how to build an FPV drone makes the entire process significantly smoother and safer. Do not cut corners on tools — a poor-quality soldering iron in particular will make the most critical part of the build far more difficult and increase the risk of cold joints, damaged components, and frustrating rework.
- Soldering iron: Temperature-controlled, at least 60W. Set to 350–380°C for most FPV soldering work. A quality iron like the TS80P or Hakko FX-888D makes a significant difference.
- Solder: 63/37 rosin core, 0.6–0.8mm diameter. Lead-free solder is harder to work with — 63/37 leaded solder flows better and produces stronger joints for beginners.
- Hex screwdriver set: M2 and M3 hex keys are the most commonly used sizes in FPV builds. A proper T-handle set gives much better torque control than a standard handle.
- Multimeter: Essential for checking polarity, continuity, and voltage before and after soldering. Any basic digital multimeter will work for FPV builds.
- Smoke stopper: A light bulb or purpose-built device wired between your battery and XT60 connector that limits current if a short circuit is present. Prevents catastrophic ESC and FC damage during first power-on.
- Electrical tape and heat shrink: For insulating exposed connections and protecting wire runs from vibration and chafing.
- Thread locker (Loctite Blue 243): Applied to motor screws and frame hardware to prevent vibration from loosening fasteners during flight.
- Wire strippers and flush cutters: For clean wire preparation and trimming component leads.
- Helping hands or PCB vise: Holds components steady while soldering so you have both hands free for the iron and solder.
- Isopropyl alcohol (90%+) and flux remover: For cleaning flux residue from solder joints after work is complete.
Step-by-Step Guide: How to Build an FPV Drone
Now that you have your parts and tools ready, it is time to begin the actual build. Follow each step carefully and do not rush. A methodical approach to learning how to build an FPV drone ensures you catch potential issues early before they become costly or time-consuming problems later in the process.
Step 1: Frame Assembly — The Foundation of How to Build an FPV Drone
Start by assembling the frame according to the manufacturer’s instructions. The GEPRC Vapor X5 uses a true-X layout with a bottom plate, four arms, a mid-plate for the stack, and a top plate. Begin by attaching the arms to the bottom plate, ensuring each arm is correctly oriented with the motor mounting holes facing upward.
Tighten all arm screws firmly but do not over-torque — carbon fiber frames can crack under excessive force. Use thread locker on each screw to prevent vibration-induced loosening. Check that all arms are parallel and that the frame sits flat on a table surface. Any twist in the frame will cause persistent tuning problems that are very difficult to diagnose once motors and electronics are installed.
Install the stack standoffs on the mid-plate at this stage. These are the threaded posts that will support the ESC and FC stack. Ensure they are all exactly the same height — mismatched standoff heights will stress solder joints and the PCB itself during flight vibrations. This forms the structural foundation of your entire how to build an FPV drone project, so build it carefully and check everything twice before proceeding.
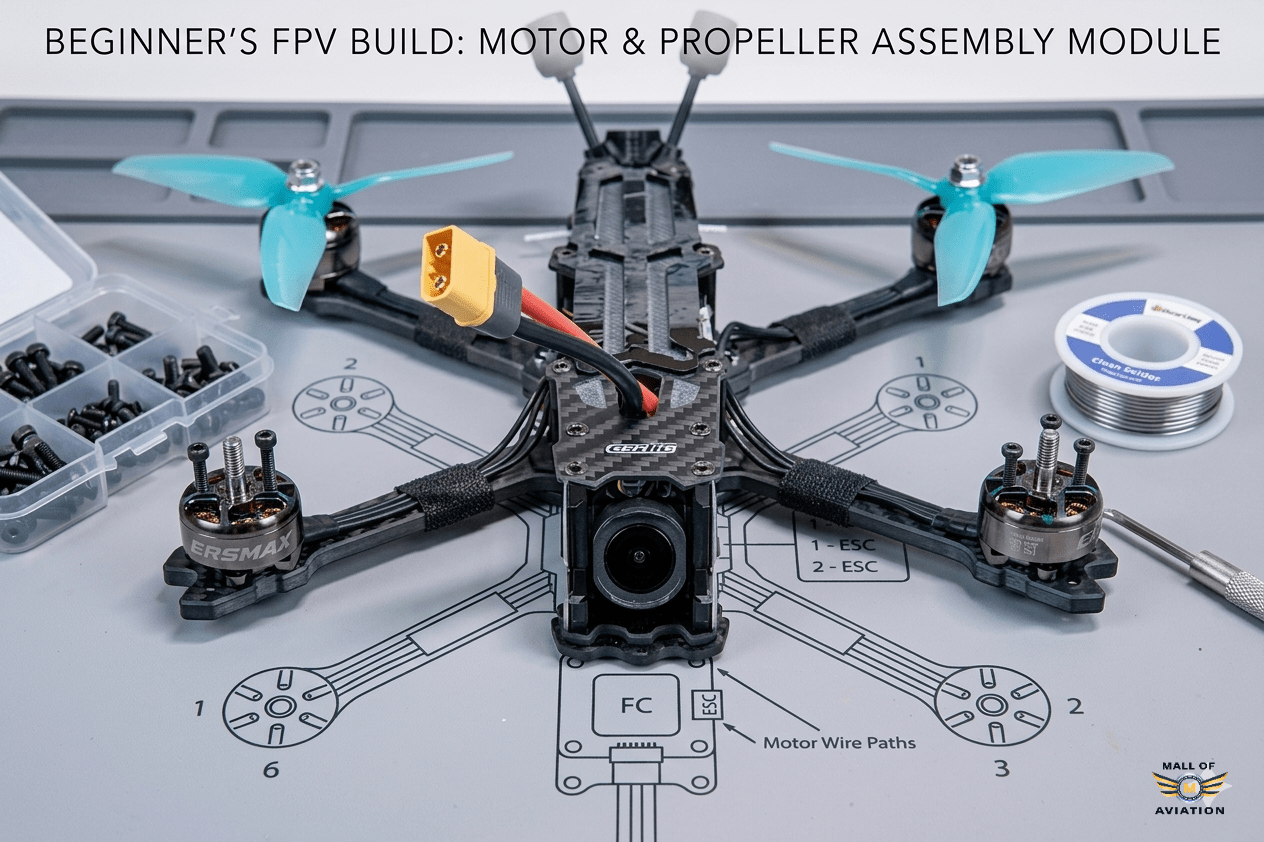
Step 2: Installing Motors — How to Build an FPV Drone Propulsion System
Mount motors on each arm using the correct length screws supplied with your motor set. The EMAX ECO II 2207 motors use M3 screws — it is critical to use the correct length here. Screws that are too long will penetrate into the motor stator cavity and damage the copper windings, while screws that are too short will not engage enough thread to hold securely under the stresses of flight and crash impacts.
- Apply a small drop of thread locker (Loctite Blue) to each motor screw before installation
- Tighten in a cross pattern to ensure even seating of the motor base
- Use all four screws on each motor — never fly with fewer for “convenience”
- Check that each motor spins freely by hand before proceeding — any stiffness may indicate a screw penetrating the stator
- Route motor wires along each arm toward the center of the frame for a clean, protected build
Label or keep track of which motor is in which position — front-left, front-right, rear-left, rear-right. You will need this information later when connecting motor wires to the ESC and configuring motor direction in Betaflight. If you need a reference on motor direction conventions, our Betaflight setup guide covers the standard motor layout in full detail.
Step 3: Wiring Diagram & Planning Your How to Build an FPV Drone Project
Before picking up your soldering iron, spend time planning your complete wiring layout. Good wire management is one of the clearest indicators of build quality and experience — a well-wired drone is not just aesthetically satisfying, it is also more reliable, easier to service, and less likely to suffer wiring failures from vibration and crashes.
- Dry fit all components: Place the ESC, FC, receiver, and DJI O4 Pro Air Unit in their approximate positions without connecting anything. This gives you a clear picture of how components relate spatially before any permanent work begins.
- Measure and cut wire lengths: Measure the actual distance each wire needs to travel with appropriate slack, then cut to length before stripping and tinning. Avoid excessive wire length — surplus wire adds weight and creates a tangled mess that interferes with component cooling and maintenance.
- Plan your layout systematically: Route motor wires cleanly along the arms. Plan battery lead routing to avoid contact with the frame or other components. Identify where signal wires will run between the FC and receiver and between the FC and DJI O4 Pro.
- Refer to official documentation: The Speedybee F405 V4 official documentation provides the definitive pinout and wiring diagram for this flight controller — always reference this when planning your build.
Good planning at this stage avoids messy builds, reduces rework, and dramatically simplifies the Betaflight setup steps that follow later in your how to build an FPV drone journey.
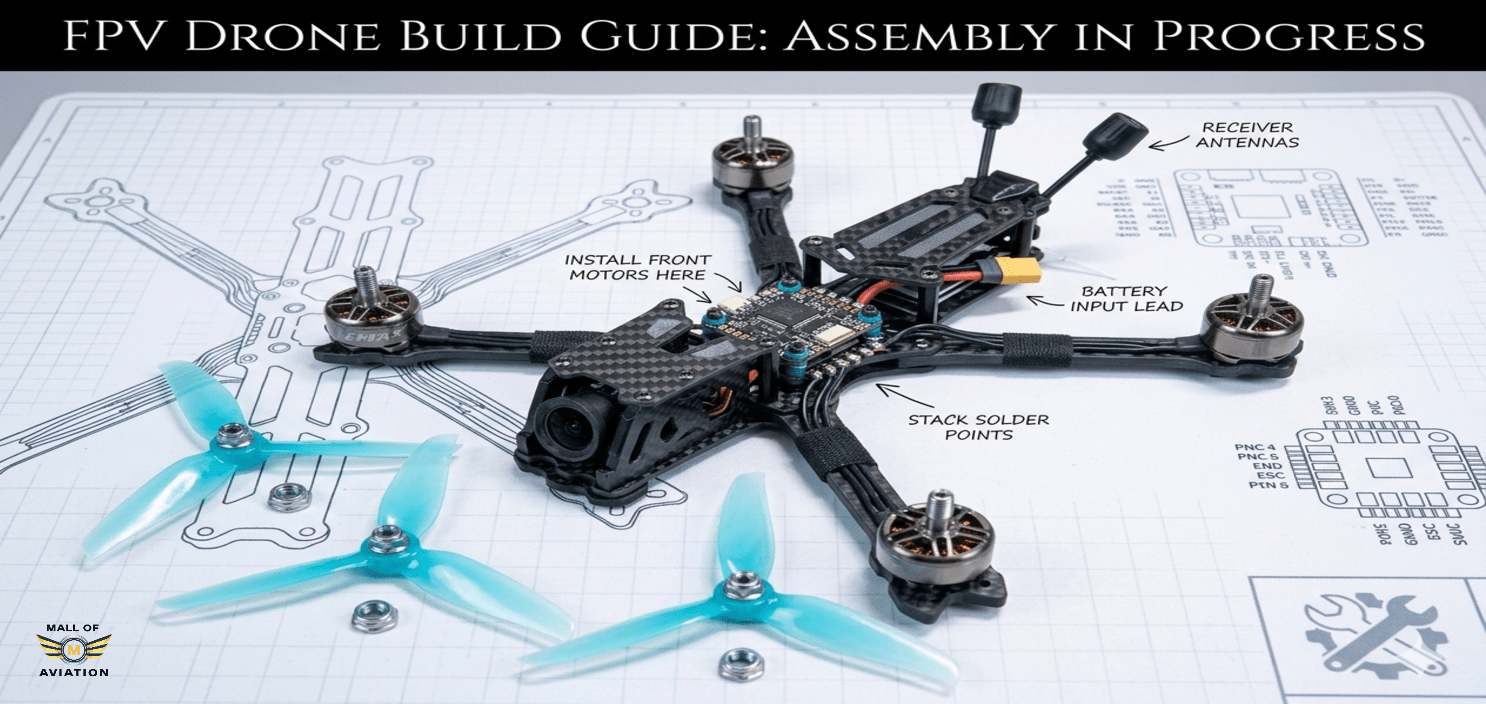
Step 4: Installing and Soldering the ESC Stack
Install the ESC stack onto the frame standoffs and begin soldering. This is the most technically demanding part of learning how to build an FPV drone. Take your time, work methodically, and check every joint before moving to the next connection.
Begin by tinning the ESC pads — applying a small amount of solder to each pad before making the actual connection. This makes the final joint much cleaner and reduces the time the iron needs to spend on each connection, minimizing heat stress to the PCB.
- Motor wires: Solder the three motor phase wires to the three motor pads for each motor on the ESC. Motor direction will be corrected in Betaflight — do not worry about wire order at this stage.
- XT60 battery lead: Solder the XT60 connector to the battery positive and negative pads on the ESC. Use appropriately thick wire — at minimum 14AWG, preferably 12AWG for a 6S 60A ESC to handle peak current loads without resistance-induced heating.
- Capacitor: Solder the 1000μF electrolytic capacitor across the battery pads (observe polarity — positive lead to positive pad). The capacitor filters out voltage spikes generated by rapid motor speed changes and significantly extends ESC lifespan.
Step 5: Testing ESC & Motors Before First Power-On
Before connecting a battery, perform a thorough pre-power safety check. This step is one of the most critical in the entire how to build an FPV drone process and should never be skipped, regardless of how confident you feel about your soldering work.
- Visual inspection: Check every solder joint under bright light. Good joints are shiny, smooth, and dome-shaped. Cold joints appear dull and granular. Bridge shorts appear as solder connecting two pads that should be separate — particularly dangerous between positive and negative battery pads.
- Multimeter continuity check: Set your multimeter to continuity mode and check that positive and negative battery pads are not shorted to each other. A beep or low resistance reading between them means you have a short — find and fix it before proceeding.
- Smoke stopper: Connect your smoke stopper in series between the battery and XT60 connector before the very first power-on. If a short exists that you missed, the smoke stopper limits current and protects your components from catastrophic damage. This simple device can save hundreds of dollars in a single use.
- Motor test in Betaflight: Once the build powers on safely, connect to Betaflight Configurator and use the Motor tab to individually test each motor. Verify the correct motor spins and that each motor spins in the correct direction per the Betaflight motor layout diagram.
Step 6: Receiver Setup & Binding — How to Build an FPV Drone Radio Link
Connect the BetaFPV ELRS Nano receiver to the flight controller using the standard UART connection. The receiver requires four connections to the FC: power (5V), ground (GND), and the UART transmit and receive lines (TX and RX).
- 5V → V (receiver power input)
- GND → G (common ground)
- FC UART TX → Receiver RX
- FC UART RX → Receiver TX
Note that TX connects to RX and vice versa — this is standard UART cross-connection and is correct. A common mistake when learning how to build an FPV drone is connecting TX to TX and RX to RX, which results in no communication between the FC and receiver.
After wiring, enter binding mode on the receiver and bind it to your ExpressLRS transmitter module. Then configure the receiver protocol in Betaflight under the Configuration and Receiver tabs. The official ExpressLRS documentation provides detailed binding and configuration instructions for all ELRS receivers.
Step 7: Installing DJI O4 Pro Air Unit — How to Build an FPV Drone Video System
The DJI O4 Pro Air Unit is the crown jewel of this how to build an FPV drone build, delivering crystal-clear 1080p HD video transmission with low latency. Proper installation is critical for both video performance and system reliability.
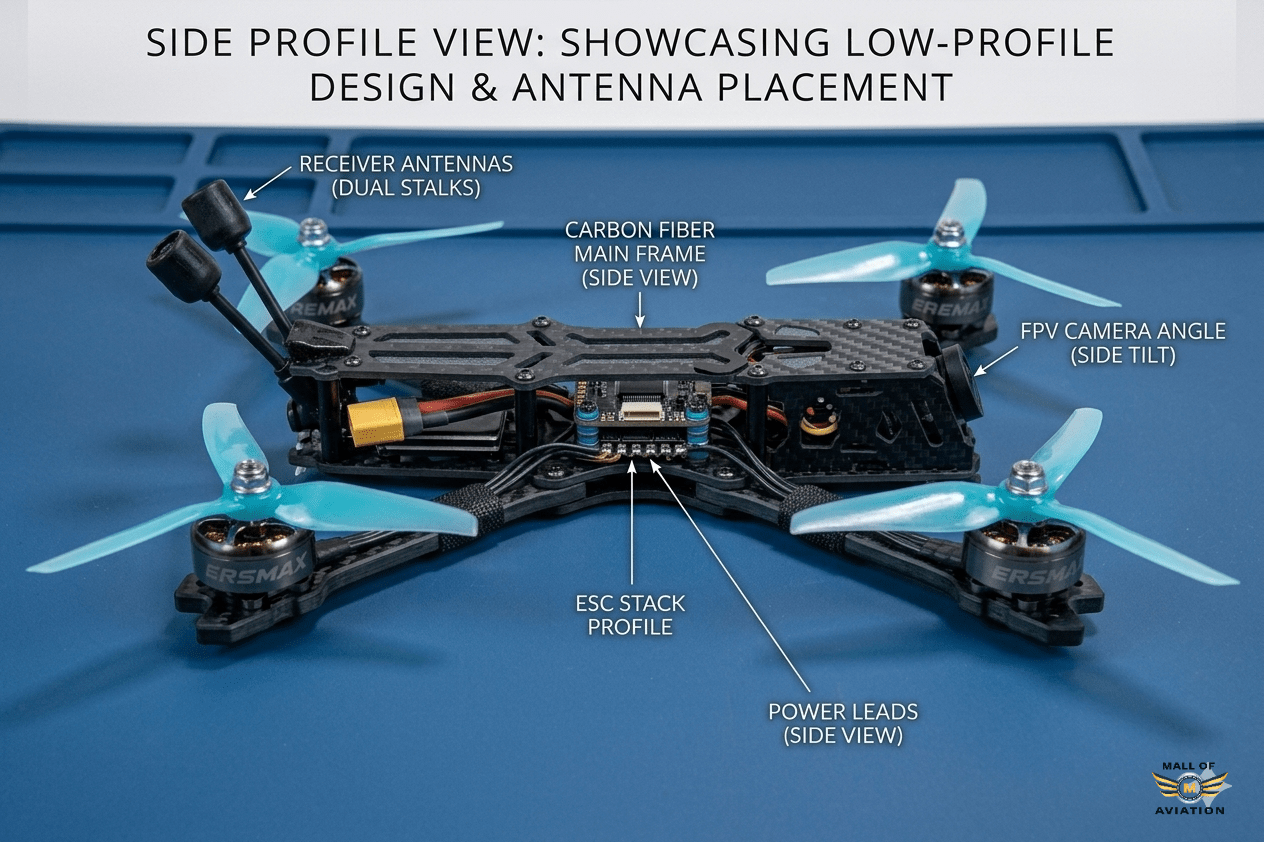
- Mount the Air Unit: Install the DJI O4 Pro Air Unit in the designated position within the frame. Use vibration-damping mounts if provided — this reduces camera jello caused by motor vibration.
- Connect to the FC: Plug the O4 Pro cable into the designated MSP/UART port on the Speedybee F405 V4. The DJI system uses this connection to receive OSD data from Betaflight and display flight telemetry overlaid on your video feed.
- Antenna mounting: Mount the O4 Pro video transmission antennas in a secure position on the frame. Antennas should be positioned so they are protected from direct prop strikes and have clear line-of-sight in multiple directions. Never fly with loose or unsecured antennas — poor antenna connection dramatically reduces video range and reliability.
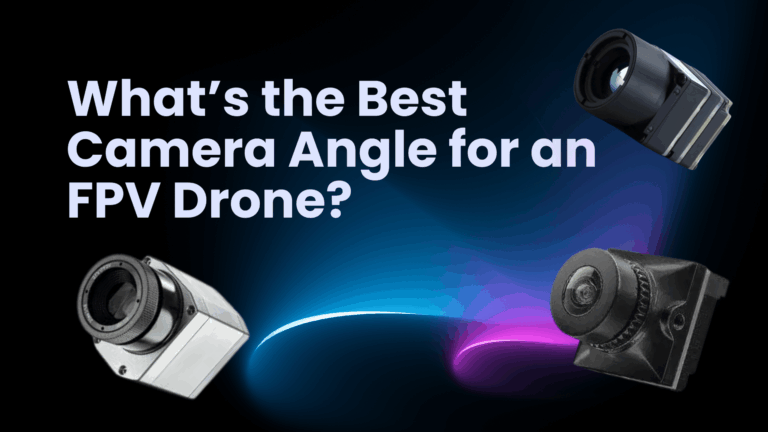
- Camera installation: Mount the O4 Pro camera using the included hardware and vibration-damping foam. Adjust camera angle to your preferred tilt — beginners typically start with 15–25 degrees of forward tilt, while experienced freestyle pilots often prefer 30–45 degrees for high-speed flight.
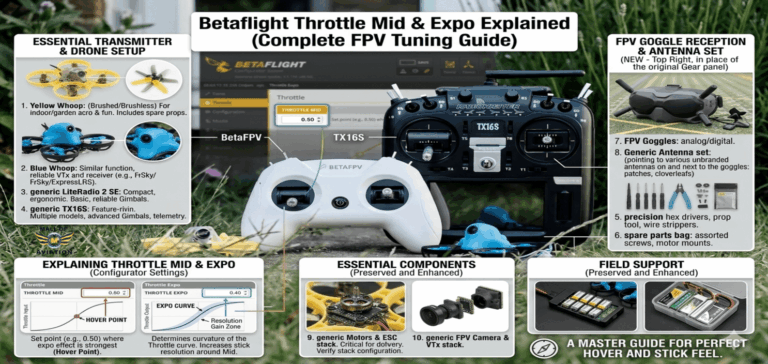
- OSD configuration: In Betaflight, navigate to the OSD tab and enable the data fields you want displayed in your video feed — battery voltage, current draw, GPS data, and flight mode are the most commonly used overlay elements.
Step 8: Finishing the How to Build an FPV Drone Assembly
With all major components installed and wired, it is time to complete the physical assembly of your how to build an FPV drone project.
- Install the top plate: Route all remaining wires cleanly before closing the frame. Use zip ties to bundle wire runs and keep them away from moving parts, especially the propeller arcs. This is also your last opportunity for easy access to all internal components — take your time and route everything thoughtfully.
- Check center of gravity: Balance the drone on two fingers placed under the frame center. A balanced drone has its center of gravity very close to the geometric center of the motor pattern. Adjust battery mounting position to achieve the best balance. Significant imbalance causes asymmetric flight behavior and makes tuning more difficult.
- Install propellers: Install propellers in the correct orientation for each motor direction. On a standard quadcopter, front-left and rear-right motors spin clockwise (use CW propellers) and front-right and rear-left motors spin counter-clockwise (use CCW propellers). Incorrect propeller direction is one of the most common first-build mistakes.
- Final mechanical check: Gently wiggle each motor, propeller, and connector to verify all connections are secure. Check that no wires can contact rotating propellers or be pinched by the frame.
Step 9: Betaflight Setup — How to Build an FPV Drone Software Configuration
Betaflight is the open-source flight controller firmware that runs on your FC and controls every aspect of how your drone flies. Proper Betaflight configuration is just as important as the physical build when learning how to build an FPV drone. The official Betaflight configuration documentation is the authoritative reference for all firmware settings. You can also follow our step-by-step Betaflight setup guide for a beginner-friendly walkthrough of every tab and setting.
Key Betaflight configuration steps for your how to build an FPV drone project:
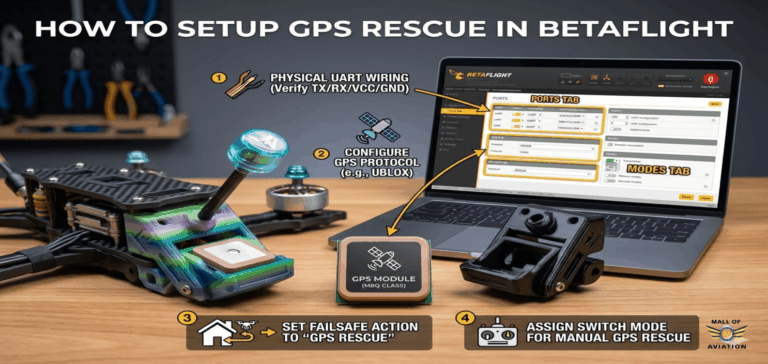
- Ports tab: Enable UART Serial RX on the port connected to your ELRS receiver. Enable MSP on the UART connected to the DJI O4 Pro Air Unit for OSD data transmission.
- Configuration tab: Set receiver type to Serial (CRSF/ELRS). Enable features appropriate to your build — Motor Stop, Airmode, and the DJI VTX telemetry preset for the O4 Pro.
- Receiver tab: Verify all channels are reading correctly and responding to transmitter input. Check that stick center values are at 1500 and full stick deflection reaches approximately 1000 and 2000. Set channel mapping to match your radio’s channel order.
- Modes tab: Assign flight modes to your transmitter switches. At minimum, configure an ARM/DISARM switch, an Angle mode (stabilized) switch for learning, and a Beeper switch for finding your drone after crashes.
- OSD tab: Configure the on-screen display elements for the DJI O4 Pro. Battery voltage is the most critical — always display remaining battery voltage so you can return to land before over-discharging your LiPo.
- Motor tab: Verify motor directions using the motor test feature. Motors should follow the Betaflight standard motor layout. Incorrect motor direction can be corrected either by swapping any two phase wires at the motor or using the BLHeli/BLHeli-32 configuration tool to reverse motor direction electronically.
Step 10: Tuning Your How to Build an FPV Drone Project
One of the most exciting aspects of completing your how to build an FPV drone project is the ability to tune flight performance to your exact preferences. Betaflight’s default PID tune is designed to provide acceptable performance on a wide range of builds — your drone will fly reasonably well out of the box. However, investing time in tuning will dramatically improve flight quality, efficiency, and feel.
Default tune works fine for initial flights, but progressive tuning improves:
- Flight stability: Reducing oscillations and improving how well the drone holds its attitude in turbulent air
- Propwash handling: The turbulence that occurs during quick direction changes in freestyle — properly tuned drones handle propwash with much greater smoothness
- Responsiveness: The speed and precision with which the drone responds to stick input
- Efficiency: Well-tuned drones waste less energy fighting oscillations, resulting in longer flight times on the same battery
- Motor temperature: Correctly tuned PIDs produce less wasted heat in motors, extending their operational life
Begin with the Betaflight presets for your specific FC and motor combination — the Speedybee F405 V4 has community-created preset files that provide an excellent starting point. Use Blackbox logging to record flight data, then analyze it using Betaflight Blackbox Explorer to identify specific problems and tune accordingly.
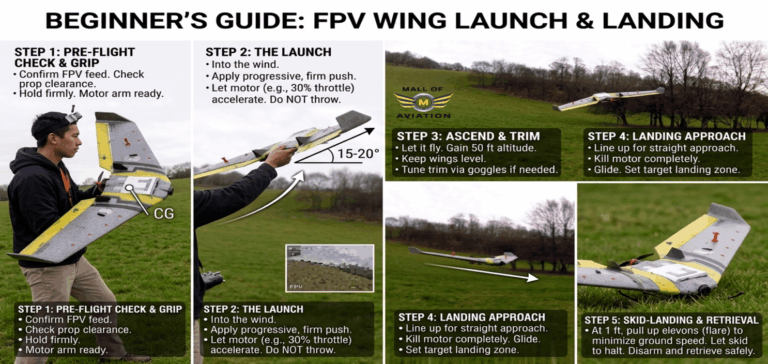
Step 11: Learning to Fly After You Build an FPV Drone
Completing your how to build an FPV drone project is a major achievement — but the journey is just beginning. Flying FPV in Acro (manual) mode, which is the standard mode for all serious FPV flying, has a significant learning curve. There is no self-leveling assistance in Acro mode — the drone does exactly what your sticks command, and maintaining stable flight is entirely up to your muscle memory and spatial awareness.
The most effective approach to learning FPV flying after you build an FPV drone:
- Start with FPV simulators: Liftoff, Velocidrone, and the DRL Simulator are the most popular FPV simulators available in 2026. Practice in the simulator for at minimum 5–10 hours before flying your real build. Simulator time is free (no crash damage), always available (no weather dependency), and directly transferable to real-world flying skill. This is the single most important advice for anyone who wants to learn how to build an FPV drone and then fly it confidently.
- Practice in open fields: Your first real flights should be in large, open spaces with no obstacles. Fly at low altitude and low speed, focus on smooth, deliberate stick movements, and resist the temptation to fly aggressively before your muscle memory is developed.
- Slow and steady progression: Progress from basic hover and directional control, to figure-eights and smooth turns, to low altitude fast cruising, and eventually to proximity freestyle. Each step builds the skills needed for the next.
- Fly in Angle mode initially: If the progression from simulator to Acro mode feels too abrupt, spend a few flights in Angle (self-leveling) mode to build spatial confidence before switching to full Acro.
- Progress gradually to freestyle: Advanced freestyle maneuvers — power loops, split-S rolls, and inverted flight sequences — will come naturally as your confidence and muscle memory develop through consistent practice.
FAQ — How to Build an FPV Drone
Is learning how to build an FPV drone hard for beginners?
Learning how to build an FPV drone is challenging but absolutely achievable for anyone willing to invest time and patience. The most difficult aspects are soldering quality and Betaflight configuration — both improve dramatically with practice and the right guidance. Most beginners complete their first successful build after one to three dedicated sessions.
How long does it take to build an FPV drone from scratch?
Most first-time builders should budget 8–12 hours for a complete build including wiring, Betaflight setup, and initial testing. Experienced builders who know exactly how to build an FPV drone can complete the same build in 3–5 hours. Do not rush your first build — the knowledge you absorb by working carefully is the entire point.
What is the best battery for this DJI O4 Pro build?
A 6S LiPo battery in the 1000–1300mAh range at 45C or higher is ideal for this build. 6S voltage gives the EMAX ECO II 1900KV motors excellent power output while maintaining efficient operation. Higher capacity (1500mAh+) extends flight time but adds significant weight — the 1000–1300mAh range is the best balance for 5-inch freestyle flying.
Is the DJI O4 Pro Air Unit worth the investment?
Yes — the DJI O4 Pro is the best digital FPV system available for 5-inch builds in 2026. The combination of HD video quality, excellent penetration, low latency, and OSD integration makes it the clear recommendation for any builder who wants the best possible flying experience. The premium price over analog systems is justified by the dramatic improvement in both video quality and range.
Can I build an FPV drone without knowing how to solder?
No — soldering is an essential skill for anyone learning how to build an FPV drone. There are no reliable solder-free alternatives for FPV drone wiring that hold up to crash impacts and vibration. The good news is that basic FPV soldering requires only a few fundamental techniques that most beginners master within a single practice session.
Do I need GPS when learning how to build an FPV drone?
GPS is optional but recommended, especially for beginner pilots. A GPS module enables Return-to-Home (RTH) functionality, which automatically flies the drone back to its launch point if signal is lost or the pilot becomes disoriented. For experienced Acro pilots, GPS is often omitted to save weight — but for beginners still learning how to build an FPV drone and fly, it provides valuable safety backup.
Is ELRS the best receiver choice for an FPV drone build in 2026?
Yes — ExpressLRS (ELRS) has become the dominant radio protocol for FPV drones and is the recommended choice for any how to build an FPV drone project in 2026. It offers the lowest latency of any widely available radio system, exceptional range, open-source development, and outstanding value. The BetaFPV ELRS Nano receiver used in this build is one of the most popular and well-supported ELRS receivers available.
Can beginners fly a 5-inch FPV drone safely?
Yes, with adequate simulator preparation. The key is building confidence and basic control skills in an FPV simulator before flying your real build. A 5-inch drone is powerful and fast — respect that power, practice in large open areas, and progress gradually. Many of today’s most skilled FPV pilots started their how to build an FPV drone journey on 5-inch builds.
What is a smoke stopper and why is it essential for FPV builds?
A smoke stopper is a simple safety device wired between your battery connector and the drone’s XT60 that limits current flow if a short circuit is present during first power-on. Without a smoke stopper, a wiring error can instantly destroy your ESC, flight controller, and DJI O4 Pro Air Unit in a single power-on event. It is one of the most important tools in any how to build an FPV drone toolkit.
Is tuning necessary when I build my first FPV drone?
Not for initial flights — Betaflight’s default tune and community presets are sufficient to get airborne safely. However, progressive tuning will meaningfully improve flight feel, efficiency, and motor longevity. As you develop flying skills and gain experience with how to build an FPV drone, tuning becomes an increasingly important and rewarding part of the hobby.