How to Flash and Update Betaflight Firmware on a Flight Controller
![Top-down view of a flight controller connected to a laptop via USB cable, showing the Betaflight Configurator firmware flasher screen with the 'Load Firmware [Online]' button highlighted.](https://mallofaviation.com/wp-content/uploads/2026/03/Flash-and-Update-Betaflight-Firmware-on-a-Flight-Controller.png)
FPV Drone Guides & Tutorials
Quick Summary:
Learning how to flash and update Betaflight firmware is an essential skill for every FPV pilot. This process brings new features, bug fixes, and performance improvements to your flight controller. This complete guide from Mall of Aviation covers everything you need to safely update your FC firmware on any FPV drone.
How to Flash and Update Betaflight Firmware on a FPV flight controller (2026 Guide)
Knowing how to flash and update Betaflight firmware is one of the most valuable skills every FPV drone pilot setup should master. Whether you are building a new drone, upgrading an existing one, or fixing performance issues, this ability can save you hours of frustration. The process brings new features, improved flight performance, bug fixes, and ensures compatibility with the latest hardware. However, flashing also comes with risks — if done incorrectly, you can lose all your settings or even brick your flight controller. In this comprehensive guide by Mall of Aviation, you will learn exactly how to safely update your FC step by step, from backup to post-flash configuration.
In This Guide
- What Does Flashing Betaflight Firmware Mean?
- Should You Update Your Firmware?
- Backup Before Flashing
- How to Connect Your Flight Controller
- Choosing the Correct Firmware Target
- Step-by-Step Flashing Process
- Fixing Common Flashing Issues
- Post-Flash Configuration
- Understanding DFU Mode
- Installing Required Drivers
- FAQs About Betaflight Firmware
What Does It Mean to Flash and Update Betaflight Firmware?
Firmware is the software that runs your flight controller — similar to an operating system on a computer. When you flash and update Betaflight firmware, you are installing a new version of Betaflight directly onto your FC hardware. This process completely replaces the existing firmware with a fresh installation. You would typically do this when upgrading to a newer Betaflight version, switching to a different firmware like INAV or EmuFlight, or recovering a flight controller that has corrupted software.
The process involves putting your flight controller into DFU mode, selecting the correct firmware target, and using the Betaflight Configurator to install the new software. While it sounds technical, the steps are straightforward once you understand the sequence and have the right tools installed.
Simple Explanation: Flashing is like installing a new operating system for your drone’s brain. You give your flight controller new, updated instructions on how to fly — replacing the old version with something better.
Understanding the complete process matters because many pilots encounter problems simply by skipping steps or not understanding why each step exists. The most common issues — flight controller not detected, flash failing midway, or the FC not responding after flashing — all have straightforward causes and fixes that this guide addresses in detail.
Should You Update Your Betaflight Firmware Right Now?
Before proceeding, ask yourself a few important questions. Not every pilot needs to update immediately, and in some cases staying on a working version is the smarter choice. Here is what to consider:
- Is your drone flying perfectly? If your quad performs well and you are happy with its behavior, an update may not be necessary. New firmware versions sometimes introduce changes that require retuning your PIDs and rates.
- Do you need specific new features? Newer Betaflight releases frequently include improved filters, better presets, updated GPS modes, or support for new hardware. If these features benefit your setup, updating makes clear sense.
- Are you experiencing known bugs? If your flight controller has issues that are fixed in a newer version, updating resolves them. Check the Betaflight release notes to confirm whether your specific issue is addressed.
- Are you comfortable reconfiguring everything? Flashing erases all your existing settings completely. You will need to reconfigure your drone from scratch or restore a backup afterward — this is a significant time investment for a complex build.
Important Warning: Flashing your FC will erase ALL settings. This includes your rates, PID tuning, port assignments, receiver configuration, and OSD layout. Always create a complete backup before starting this process.
For beginners, it is often best to avoid unnecessary updates. If your drone flies well, stick with what works. Once you gain experience and confidence with Betaflight Configurator, updating becomes a routine maintenance task rather than a stressful operation.
Backup Your Configuration Before Flashing
This is the single most critical step in the entire process. A proper backup ensures you can restore your configuration quickly if anything goes wrong or if you decide you preferred your previous setup. Never attempt any firmware update without a backup in place. Here are two reliable methods:
Method 1: Using the Presets Tab
- Open Betaflight Configurator and connect to your flight controller normally
- Navigate to the Presets tab in the left sidebar
- Click on Save Backup and choose a location on your computer
- Name the file with the current date and Betaflight version for easy reference
- Confirm the file has been saved before disconnecting
Method 2: Using CLI Dump
- Go to the CLI tab in Betaflight Configurator
- Type
dump alland press Enter to export all settings - Select and copy all the text that appears in the output window
- Paste it into a plain text file and save it with a descriptive filename
- Keep this file in a dedicated folder for your drone configurations
Golden Rule: A backup takes 30 seconds but can save you hours of reconfiguration work. Experienced pilots back up before every single firmware change, no matter how minor.
It is also worth noting that backups from one Betaflight version may not restore perfectly to a significantly different version. Major version changes (for example, moving from 4.4 to 4.5) can include parameter name changes that prevent a direct restore. In these cases, use your backup as a reference document to manually recreate your settings rather than a direct import.
How to Connect Your Flight Controller to Betaflight Configurator
Before the flashing process can begin, you need to establish a proper connection between your flight controller and Betaflight Configurator. A poor connection is one of the most common causes of failed firmware installations.
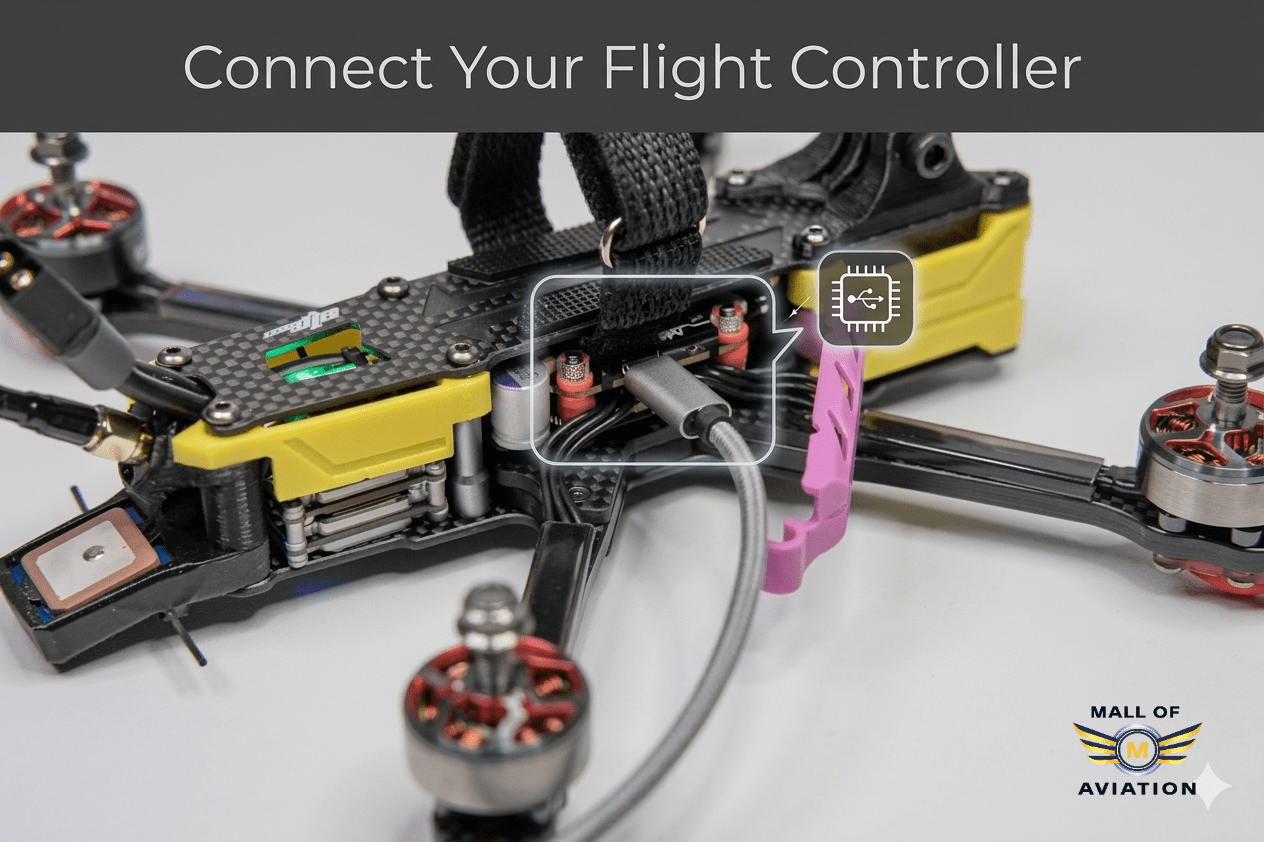
- Use a data-capable USB cable. Many USB cables are charge-only and cannot transfer data. If your FC is not detected, trying a different cable is the first troubleshooting step.
- Open Betaflight Configurator on your computer before connecting the FC.
- Plug the USB cable into your flight controller and wait a few seconds for detection.
- Look for the correct COM port to appear in the Configurator’s top-right dropdown. On Windows it appears as COM3, COM4, etc. On Mac it appears as /dev/tty.usbmodem.
- Select the correct port and click Connect to establish communication.
Connection Tip: If multiple COM ports appear simultaneously, unplug and replug the USB cable while watching the dropdown. The port that appears and disappears is your flight controller’s port.
Some flight controllers also require that you install a specific USB driver before they are recognized by your computer. This is particularly common on Windows systems and with certain STM32-based flight controllers. The driver installation process is covered in detail in the Drivers section below.
Choosing the Correct Firmware Target for Your Flight Controller
Every flight controller requires a specific firmware target — a build of Betaflight compiled specifically for that hardware’s processor and pin configuration. Installing the wrong target is one of the most serious mistakes you can make, potentially resulting in non-functional sensors, incorrect motor mapping, or a completely unresponsive FC. Here is how to identify your correct target:
- Auto Detect: In the Firmware Flasher tab, click Auto Detect. The Configurator will attempt to identify your target automatically from the currently installed firmware.
- CLI Version Command: While connected normally, type
versionin the CLI tab. The output includes the target name on the second line. - Manufacturer Documentation: Look up your specific flight controller model on the manufacturer’s website. The target name is always listed in the product documentation or firmware section.
- Physical Board Inspection: Many flight controllers have the target name or processor type printed or silkscreened on the circuit board itself.
Critical Warning: Flashing an incorrect firmware target can leave your flight controller in a non-functional state. Always verify your target through at least two independent methods before proceeding with the firmware installation.
It is also worth understanding the difference between unified targets and dedicated targets. Unified targets (prefixed with STM32F7X2 or similar) cover multiple FC hardware designs and rely on manufacturer-provided custom defaults. Dedicated targets are built specifically for a single hardware design. When both options exist for your FC, the dedicated target is generally preferred for better out-of-the-box compatibility.
Step-by-Step Process to Flash and Update Betaflight Firmware
With your backup complete and your target identified, you are ready to begin the actual firmware installation. Follow each step in sequence for the most reliable result.
Step 1: Open the Firmware Flasher Tab
In Betaflight Configurator, click on the Firmware Flasher tab in the left sidebar. This tab is specifically designed for the firmware update process and contains all the controls you need. You do not need to be connected to your FC to access this tab — it is available from the main navigation.
Step 2: Select Your Target
From the Target dropdown menu at the top of the Firmware Flasher, select the exact target that matches your flight controller hardware. Use the search field to filter the list if you know your target name. Double-check the selection before proceeding.
Step 3: Choose the Firmware Version
From the Version dropdown, select the firmware version you want to install. For most pilots, the latest stable release is the best choice. Release Candidate (RC) versions contain newer features but may have undiscovered bugs — only use RC versions if you need a specific feature they contain and understand the additional risk.
Step 4: Configure Build Options
If you are using a unified target, you may have the option to select specific firmware features to include or exclude. Only enable features your build actually uses — this keeps the firmware size manageable and reduces the risk of memory-related issues. Common features include GPS, LED Strip, OSD, and camera control.
Step 5: Enable Full Chip Erase
Check the Full Chip Erase checkbox before clicking Flash Firmware. This option completely wipes the existing firmware before installing the new one, preventing conflicts between old and new configuration data. It is strongly recommended for major version updates. Note that enabling this option also erases any existing configuration, which is why the backup step earlier is so important.
Step 6: Load and Flash the Firmware
Click Load Firmware (Online) to download the selected firmware to your computer. Wait for the download to complete — the progress bar will indicate completion. Then click Flash Firmware to begin the installation process. Do not disconnect the USB cable or close the Configurator during this process. The flashing typically takes between 30 seconds and 2 minutes depending on your system.
Pro Tip: When configuring build options for a unified target, only enable features you actively use. This keeps your firmware lean and efficient, saving precious flash memory space for configuration data.
Step 7: Verify Successful Installation
After flashing completes, Betaflight Configurator will display a success message. The flight controller will automatically restart. Connect to the FC again using the Connect button and navigate to the Setup tab. Verify that the displayed Betaflight version number matches the version you installed. If it does, your firmware update was successful.
Understanding DFU Mode for Firmware Installation
DFU stands for Device Firmware Update. It is a special low-level bootloader mode that allows you to write firmware directly to the flight controller’s processor flash memory, bypassing the normal operating firmware. Your flight controller must be in DFU mode for the Betaflight Configurator to install new firmware — it cannot write to the processor while the existing firmware is actively running.
- Automatic DFU Entry: Most modern flight controllers automatically enter DFU mode when the Firmware Flasher tab initiates the flash process. Betaflight Configurator sends a command that triggers this transition seamlessly without any manual intervention required.
- Manual DFU Entry: If automatic entry does not work, you can manually enter DFU mode by pressing and holding the BOOT button on your flight controller while connecting the USB cable. Release the BOOT button after the connection is established.
- Recognizing DFU Mode: When your FC is in DFU mode, Betaflight Configurator displays “DFU” in the port selector instead of a COM port number. On Windows Device Manager, the device appears as “STM32 BOOTLOADER” rather than a serial device.
- Exiting DFU Mode: DFU mode exits automatically after successful firmware installation and the FC restarts. If you need to exit manually, simply unplug and replug the USB cable without holding any buttons.
Understanding DFU mode also explains why the ImpulseRC Driver Fixer (described in the next section) is sometimes necessary — Windows requires a specific driver to recognize STM32 devices in DFU mode, and this driver is not installed by default on most Windows systems.
Installing Required Drivers for flash and update betaflight firmware
On some systems — particularly Windows — your computer may not automatically recognize your flight controller, especially when it enters DFU mode. This is a driver issue, not a hardware problem with your FC. Here is how to resolve it:
For Windows Users
- Download the ImpulseRC Driver Fixer tool — it is free and specifically designed to install the correct STM32 DFU drivers for flight controllers
- Connect your flight controller via USB before running the tool
- Run ImpulseRC Driver Fixer as Administrator
- The tool automatically detects and installs any missing or incorrect drivers
- Restart Betaflight Configurator after the driver installation completes
For Mac and Linux Users
macOS and Linux systems generally handle STM32 USB devices without additional driver installation. If your FC is not detected on these systems, verify that Betaflight Configurator has been granted USB device permissions in your system security settings. On Linux, you may need to add a udev rule to allow non-root access to USB devices.
Driver issues are particularly common after Windows updates, which can sometimes reset or corrupt previously installed USB drivers. If firmware flashing was working previously but has suddenly stopped, a driver reinstallation through ImpulseRC Driver Fixer is often the fastest solution.
Fixing Common Problems When flash and update betaflight firmware
Even with careful preparation, issues can occasionally occur during the firmware update process. Here are the most frequently encountered problems and their proven solutions:
| Problem | Likely Cause | Solution |
|---|---|---|
| FC not detected in Configurator | Missing or incorrect USB driver | Run ImpulseRC Driver Fixer as Administrator |
| Flash process fails or stops | FC not entering DFU mode properly | Hold BOOT button while connecting USB, then retry |
| Bootloader error during flash | Faulty USB cable or unstable connection | Try a different USB cable and a different USB port on your computer |
| FC unresponsive after flashing | Wrong firmware target installed | Re-enter DFU mode manually and flash the correct target |
| Download fails in Firmware Flasher | Internet connectivity or firewall issue | Download firmware manually from GitHub and use Load Firmware (Local) option |
| Version shows unchanged after flash | Flash completed but FC cached old version info | Unplug USB, wait 10 seconds, reconnect and check version again |
If none of these solutions resolve your issue, the Betaflight community is an excellent resource. The official Betaflight Discord server and the r/Betaflight subreddit have thousands of experienced pilots who have encountered and resolved virtually every possible flashing scenario. Provide your FC model, OS version, Configurator version, and a screenshot of the error message for the fastest assistance.
Post-Flash Configuration — Setting Up Your FC After Updating
Congratulations on successfully completing your firmware update. With the new firmware installed, your flight controller is essentially a blank slate — ready to be configured for your specific build. Work through these steps methodically to restore your drone to flying condition:
Step 1: Calibrate the Accelerometer
Navigate to the Setup tab. Place your drone on a perfectly flat, level surface. Click Calibrate Accelerometer and wait for the process to complete. This calibration is critical for stable flight behavior — any tilt error in the accelerometer calibration will result in a drone that drifts in the corresponding direction during stabilized flight modes.
Step 2: Configure Ports
Navigate to the Ports tab and re-enable any UARTs that your build uses — typically your receiver, ESC telemetry, GPS (if applicable), and any other serial peripherals. Port assignments are completely erased during the flash process and must be manually reassigned. Refer to your backup or your physical wiring to determine the correct assignments.
Step 3: Enable Required Features
In the Configuration tab, re-enable the features your build requires — such as the accelerometer, barometer, OSD, and any other hardware features. Double-check your receiver mode (SBUS, CRSF, ELRS) and your FPV ESC controller (DSHOT300, DSHOT600) settings.
Step 4: Restore Your Settings Backup
If you saved a backup using the Presets tab, navigate to Presets and click Load Backup to restore your previous configuration. If you used the CLI dump method, paste your saved configuration into the CLI tab and press Enter. Note that some settings may not restore correctly if the new firmware version has changed parameter names — review the Betaflight release notes to identify any breaking changes.
Step 5: Verify Motor Direction and Mapping
In the Motors tab, verify that your FPV drone motor direction are correct and that the motor mapping corresponds to your drone’s physical layout. New firmware installations can occasionally reset these settings, and flying with incorrect motor configuration is dangerous.
Next Step: After completing post-flash configuration, take your drone for a gentle test hover in a safe, open area with plenty of space for unexpected behavior. Keep the first flight brief and observe carefully for any abnormal flight characteristics that may indicate incorrect configuration.
FAQs About flash and update betaflight firmware
1. Is it risky to flash and update betaflight firmware?
The process is generally safe when performed correctly. The main risks are losing your configuration (prevented by backing up first) and potentially bricking the FC if the wrong target is flashed or the USB connection fails mid-flash. Following this guide’s steps minimizes both risks significantly.
2. Will I lose my settings during a firmware update?
Yes — all settings are erased when you flash new firmware, especially when using Full Chip Erase. This is why creating a complete backup before starting is mandatory. Your rates, PIDs, OSD layout, port assignments, and all other configuration will need to be restored afterward.
3. Which Betaflight version should I install?
Always install the latest stable release unless you have a specific reason to use an older version. Stable releases have passed testing and are the safest choice for everyday flying. Release Candidate versions offer newer features but may contain undiscovered bugs.
4. What is DFU mode and why is it needed?
DFU (Device Firmware Update) mode is a special bootloader state that allows direct write access to the flight controller’s processor memory. Normal firmware installation cannot occur while the existing firmware is running — DFU mode bypasses the operating firmware to allow the new one to be written.
5. How often should I update my flight controller firmware?
Update when a new version offers specific features or fixes you need, not simply because a new version exists. If your drone flies well on the current firmware, staying put is a perfectly valid choice. Major updates are typically worth the configuration effort — minor patch updates less so unless they fix a specific issue affecting your build.
6. Can I downgrade to an older Betaflight version?
Yes — you can flash any previous stable version using the same process, simply by selecting the older version number in the Firmware Flasher. This is useful if a new version introduces unexpected behavior that degrades your drone’s performance. Keep your backups from previous versions to restore configuration alongside the older firmware.
Upgrade Your Drone Performance
Find the best flight controllers, ESCs, and FPV gear at Mall of Aviation. Once your firmware is updated and your configuration is dialed in, equip your drone with quality components that match its new capabilities.
Final Thoughts: Mastering flash and update betaflight firmware
Learning how to flash and update Betaflight firmware is an essential skill that every FPV pilot should have in their toolkit. The process gives you the freedom to upgrade your drone with new features, resolve bugs, and recover from software issues that would otherwise leave your FC unusable.
Remember the fundamentals: always back up before starting, verify your target through multiple sources, use Full Chip Erase for major updates, and never disconnect the USB cable mid-flash. Follow these principles consistently and you will complete every firmware update safely and successfully.
Whether you are a beginner tackling your first update or an experienced pilot maintaining a fleet of drones, a methodical and prepared approach is what separates successful updates from frustrating failures. Betaflight continues to improve with every release, and knowing how to access those improvements keeps your equipment current and your flying experience at its best.
Mall of Aviation is here to help you build, upgrade, and master your FPV drones with confidence. Fly safe.
Recommended Resources:
Explore our FPV Beginner Build Guide and How to Choose a Flight Controller for more helpful tutorials.
For official documentation and release notes, visit the Betaflight Official Website and the Betaflight GitHub Releases Page.