How to Switch Rates During Flight Using a Switch
FPV Drone Guides & Tutorials
Quick Summary:
Betaflight allows you to switch rates during flight using a switch on your radio. This powerful feature lets you instantly change your flying style—from smooth cinematic to aggressive freestyle or racing—without landing or reconnecting to your computer. In this comprehensive guide from Mall of Aviation, you will learn exactly how to switch rates during flight using a switch, set up multiple rate profiles, and display your active profile in the OSD for instant feedback.
How to Switch Rates During Flight Using a Switch (Betaflight Tutorial)
Imagine being able to switch from smooth cinematic flying to aggressive freestyle instantly—mid-flight—without plugging into Betaflight. That is exactly what Rate Profiles allow you to do. By learning how to switch rates during flight using a switch, you can test different settings, adapt to changing situations, and improve your flying much faster. Whether you are a beginner who wants to experiment with different rates or an advanced pilot who needs different settings for different maneuvers, this feature is a game-changer. In this guide by Mall of Aviation, you will learn everything about setting up and using rate profile switching.
In This Guide
- What Are Rate Profiles?
- Why Switch Rates During Flight?
- Step 0 — Backup Your Settings
- Step 1 — Create Multiple Rate Profiles
- Step 2 — Choose a Switch on Your Radio
- Step 3 — Assign Rate Profiles to Switch
- Step 4 — Show Rate Profile in OSD
- Pro Tips for Rate Profile Switching
- Troubleshooting Common Issues
- Frequently Asked Questions
What Are Rate Profiles in Betaflight?
Rate profiles are separate configurations that store your rate settings. Each profile contains a complete set of parameters that control how your drone responds to stick inputs. Understanding rate profiles is essential before you learn how to switch rates during flight using a switch.
Each rate profile includes:
- Center Sensitivity (RC Rate): Controls how responsive the drone is around the stick center. Higher values make small stick movements feel more responsive.
- Max Rate (Rate): Determines how fast the drone rotates at full stick deflection. Higher values mean faster flips and rolls.
- Expo: Softens the stick response around the center while maintaining maximum rotation at full stick. Higher expo makes the drone feel smoother for precision flying.
- Throttle Settings: Some rate profiles also include throttle-related adjustments for different flying styles.
Betaflight allows up to 4 rate profiles. This means you can have completely different flying styles stored in one drone and switch rates during flight using a switch whenever you want.
Simple Idea: Rate profiles are like different driving modes in a car—sport mode, comfort mode, and eco mode—all available instantly with the flip of a switch. Learning to switch rates during flight using a switch gives you that same flexibility in the air.
Why Switch Rates During Flight?
There are many compelling reasons to master how to switch rates during flight using a switch. Here are the key benefits:
- Test Multiple Rates in One Flight: Instead of landing, connecting to Betaflight, changing settings, and taking off again—which can take 10 minutes per test—you can test three or four different rate profiles in a single battery pack. This accelerates your learning and helps you find your perfect rates much faster.
- Adapt to Different Flying Styles: You might start a flight with smooth cinematic rates for slow, flowing shots. Then, when you find a feature you want to freestyle, you can switch rates during flight using a switch to aggressive freestyle rates instantly.
- Adapt to Different Locations: A tight, technical bandos requires different rates than an open field with wide-open spaces. With rate profile switching, you can adapt without landing.
- Emergency Adjustment: If you find that your rates feel too sensitive or too sluggish during a flight, you can switch to a different profile immediately without risking a crash.
- Build Muscle Memory: By switching between profiles and feeling the difference, you develop a better understanding of how rates affect flight characteristics.
Step 0 — Backup Your Settings
Before making any changes to your Betaflight configuration, it is critical to back up your current settings. This ensures you can always revert if something goes wrong. This is an essential first step before you learn how to switch rates during flight using a switch.
- Open Betaflight Configurator and connect your flight controller for FPV drone.
- Navigate to the Presets tab.
- Click Save Backup.
- Choose a location on your computer and save the file with a descriptive name (e.g., “backup_before_rate_profiles.json”).
Important: Always backup before making changes. If you accidentally mess up your settings, you can restore this backup and be back to normal in seconds. This is especially important when learning how to switch rates during flight using a switch for the first time.
Step 1 — Create Multiple Rate Profiles
This is where the magic begins. To switch rates during flight using a switch, you first need multiple rate profiles to switch between. Here is how to create them.
Navigate to PID Tuning → Rate Profile in Betaflight. You will see a dropdown that allows you to select between Profile 1, 2, 3, and 4.
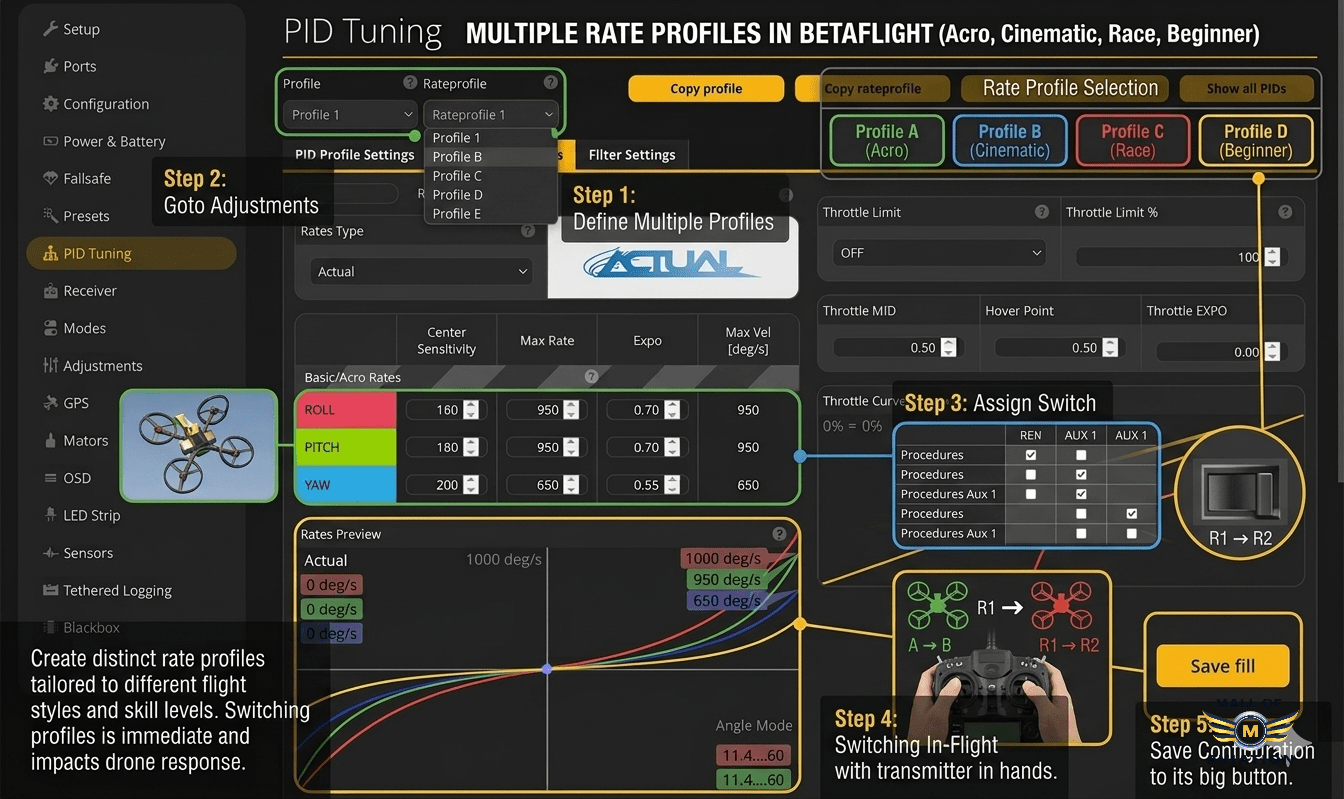
Figure 1: Creating multiple rate profiles in Betaflight is the first step to switch rates during flight using a switch.
For each profile, configure the settings according to your flying style. Here are recommended starting points:
Cinematic Profile (Smooth, Controlled Flying)
- Center Sensitivity (RC Rate): 0.70 (70%)
- Max Rate (Rate): 670 degrees/second
- Expo: 0.70 (70%)
This setup provides smooth, predictable movements ideal for slow, flowing cinematic shots and precise flying around obstacles.
Freestyle Profile (Aggressive, Trick-Friendly)
- Center Sensitivity (RC Rate): 1.80 (180%)
- Max Rate (Rate): 1000 degrees/second
- Expo: 0.70 (70%)
This setup allows for fast flips and rolls while maintaining control around the center for precise trick execution. It is the go-to for freestyle pilots.
Racing Profile (Fast, Responsive)
- Center Sensitivity (RC Rate): 2.00 (200%)
- Max Rate (Rate): 750 degrees/second
- Expo: 0.50 (50%)
Racing rates prioritize quick response and minimal expo for immediate reaction to stick inputs. The lower max rate compared to freestyle prevents over-rotation in tight turns.
Beginner Profile (Learning-Friendly)
- Center Sensitivity (RC Rate): 0.50 (50%)
- Max Rate (Rate): 500 degrees/second
- Expo: 0.50 (50%)
This setup provides a forgiving feel for new pilots learning basic maneuvers. It is a great starting point before progressing to more aggressive rates.
Tip: Name each profile clearly in Betaflight (maximum 8 characters) so you can easily identify them in the OSD. For example: “CINE”, “FREE”, “RACE”, “BEGIN”. This makes it much easier when you switch rates during flight using a switch and see the profile name in your goggles.
Step 2 — Choose a Switch on Your Radio
To switch rates during flight using a switch, you need a physical switch on your radio that will control the profile selection. Here is how to set it up.
First, pick a switch on your radio—a 3-position switch works best because Betaflight supports up to 4 profiles (though you can use a 2-position switch for 2 profiles). Common choices include the SC, SD, or SA switches on most radios.
Important Radio Setup:
- Your switch needs to output to an AUX channel (AUX1 through AUX8). Most radios allow you to assign switches to channels in the MIXES or OUTPUTS menu.
- AUX channels correspond to channels 5 and above. CH5 = AUX1, CH6 = AUX2, CH7 = AUX3, CH8 = AUX4, and so on.
- After assigning your switch to an AUX channel, verify in Betaflight that the channel moves when you flip the switch. Go to the Receiver tab and watch the AUX channel bars move as you operate the switch.
Note: Make sure your switch is sending a clean signal. If the AUX channel value jumps erratically, you may need to adjust your radio’s switch settings. A clean, consistent signal is essential when you switch rates during flight using a switch to avoid accidental profile changes.
Step 3 — Assign Rate Profiles to Your Switch
Now we get to the core of how to switch rates during flight using a switch. This is where you tell Betaflight which AUX channel controls rate profile selection.
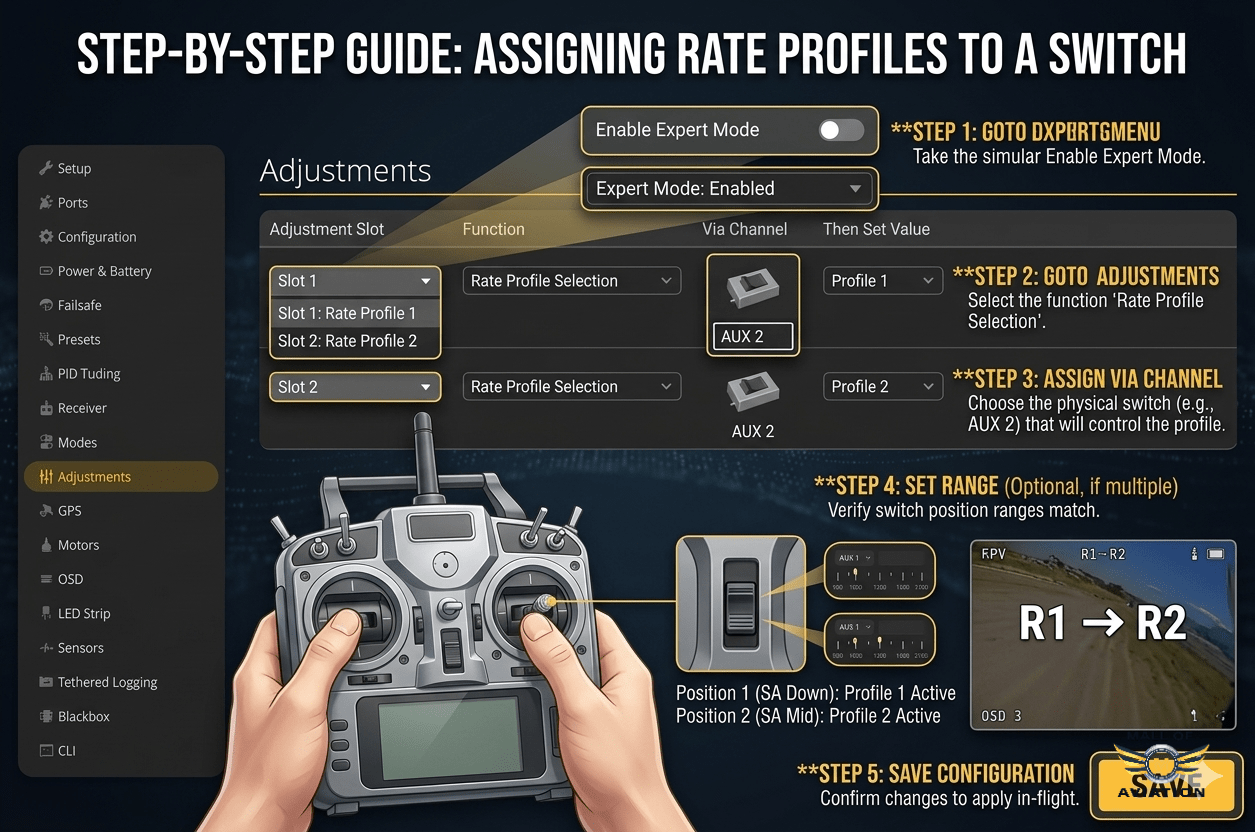
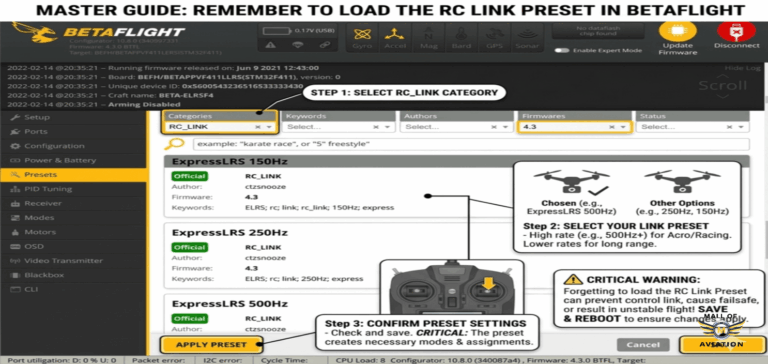
Figure 2: Assigning rate profiles to a switch in the Adjustments tab allows you to switch rates during flight using a switch.
Follow these steps:
- In Betaflight, go to the Adjustments tab.
- Click Add Adjustment to create a new slot.
- For Slot 1, set:
- Adjustment Channel: Select the AUX channel your switch is connected to (e.g., AUX1, AUX2).
- Adjustment Range: Set to “Full Range” so that all switch positions are active.
- Adjustment Function: Select Rate Profile Selection.
- Cell Selection: Select the same AUX channel again.
- Click Save.
Switch Behavior Explained:
- If you are using a 3-position switch:
- Position 1 → Rate Profile 1
- Position 2 → Rate Profile 2
- Position 3 → Rate Profile 3
- If you are using a 2-position switch:
- Position 1 → Rate Profile 1
- Position 2 → Rate Profile 2
- (Profile 3 and 4 are not accessible unless you use another switch or adjust the range mapping.)
Important: If you use a 2-position switch, the middle profile (Profile 2) will be skipped unless you map the ranges manually. For full 3-profile access, a 3-position switch is highly recommended to properly switch rates during flight using a switch.
Step 4 — Show Rate Profile in OSD
To make your rate profile switching experience complete, you should display the active profile in your goggles. This gives you instant feedback on which rates you are using without having to remember switch positions.
Here is how to enable it:
- Go to the OSD tab in Betaflight.
- Scroll down to the Elements section.
- Find and enable Rate Profile Name (sometimes labeled as “RPROF” or “Rate Profile”).
- Click and drag the element to your preferred position on the screen.
- Click Save.
Now, when you switch rates during flight using a switch, the name of the active profile will appear in your goggles. This is especially useful when testing different rate setups because you can see exactly which profile you are flying without looking away from your goggles.
Pro Tips for Using Rate Profiles
Once you have mastered how to switch rates during flight using a switch, here are some advanced tips to get the most out of this feature:
- Use Cinematic Rates for Smooth Shots: When you are filming or flying through tight spaces, switch to your cinematic profile. The lower center sensitivity and higher expo make your movements smooth and predictable.
- Use Freestyle Rates for Tricks: When you find a feature you want to freestyle—a tree, a building, or a gap—switch to your freestyle profile. The higher max rate allows for fast flips and rolls.
- Use Racing Rates for Speed: When you are on a straightaway or practicing racing lines, switch to racing rates for the fastest response.
- Test Multiple Profiles in One Flight: The best way to find your perfect rates is to test them back-to-back. Take off with Profile 1, fly for 30 seconds, switch to Profile 2, and compare. This direct comparison is invaluable.
- Emergency Switching: If your rates feel wrong—too sensitive or too sluggish—do not hesitate to switch rates during flight using a switch to a more comfortable profile. This can save you from a crash.
- Use Different Profiles for Different Locations: A tight bandos with lots of obstacles may benefit from lower rates for precision. A wide-open field may benefit from higher rates for speed and agility.
- Name Profiles Clearly: Use short, descriptive names like “CINE”, “FREE”, “RACE”, or “BEGIN” so you can easily identify them in the OSD.
Troubleshooting Common Issues
Problem: The rate profile does not change when I flip the switch.
Solution: Verify in the Betaflight Receiver tab that the AUX channel is moving when you operate the switch. Then check the Adjustments tab to ensure you selected the correct AUX channel and the correct function (Rate Profile Selection).
Problem: The switch only selects two profiles instead of three.
Solution: If you are using a 3-position switch, ensure the Adjustment Range is set to “Full Range” and not a custom range. If you are using a 2-position switch, you will only have access to two profiles unless you add additional configuration.
Problem: The rate profile name does not appear in the OSD.
Solution: Go to the OSD tab and ensure “Rate Profile Name” is enabled and placed within the visible screen area. Also ensure your OSD is configured for HD or SD as appropriate for your video system.
Problem: The rates feel wrong even after switching.
Solution: Double-check that you have configured each rate profile correctly in the PID Tuning tab. Also verify that you are switching between the profiles you intend—sometimes pilots accidentally switch to a profile they have not configured yet.
Problem: The switch changes profiles randomly.
Solution: This is usually caused by a noisy AUX channel. Check your radio settings to ensure the switch is not set to a potentiometer or dial. You may also need to add a small amount of deadband or adjust the channel endpoints.
Frequently Asked Questions About Rate Profile Switching
1. What are rate profiles in Betaflight?
Rate profiles are separate configurations that store your rate settings—center sensitivity, max rate, and expo. They allow you to have multiple flying styles stored in one drone and switch rates during flight using a switch without landing.
2. Can I really switch rates mid-flight?
Yes, absolutely. Once you set up rate profile switching in Betaflight, you can switch rates during flight using a switch instantly. The change takes effect immediately with no lag or interruption.
3. How many rate profiles can I have?
Betaflight supports up to 4 rate profiles. However, if you are using a 3-position switch, you can easily access three of them. The fourth would require additional configuration or a different switching method.
4. Do beginners need multiple rate profiles?
Yes, rate profile switching is very helpful for beginners. You can start with a conservative beginner profile and then switch rates during flight using a switch to a more aggressive profile as you gain confidence. This allows you to progress gradually without landing.
5. What is the best rate profile for freestyle?
Most freestyle pilots prefer higher center sensitivity (1.60 to 2.00) and max rates between 800 and 1000 degrees per second. Expo is usually set between 0.60 and 0.80 for a smooth center feel. However, the best way to find your perfect rates is to set up multiple profiles and switch rates during flight using a switch to compare.
6. Can I switch rate profiles using a momentary button?
Yes, you can assign rate profile selection to any AUX channel, including those controlled by momentary buttons. However, a 3-position switch is generally easier to use because it gives you clear, consistent positions for each profile.
7. Does switching rate profiles affect PIDs or filters?
No, rate profiles only affect rate settings (RC rate, rate, expo). PID and filter settings are stored in separate PID profiles. This means you can combine rate profiles with different PID profiles for even more flexibility.
8. How do I know which rate profile I am using?
Enable the “Rate Profile Name” element in the OSD tab. This will display the active profile name in your goggles. This is essential when you switch rates during flight using a switch so you always know which rates you are flying.
Upgrade Your FPV Setup
Get high-performance FPV components and build your perfect drone with Mall of Aviation. From flight controllers to radios, we have everything you need to master rate profile switching and more.
Final Thoughts: Master Rate Profile Switching
Learning how to switch rates during flight using a switch is one of the most powerful features in Betaflight. It transforms your FPV experience by giving you the flexibility to adapt to any situation, test different settings instantly, and progress faster as a pilot. Once set up, you will never want to go back to a single rate setup again.
Take the time to configure your profiles thoughtfully. Start with three distinct profiles—cinematic, freestyle, and racing—and use them to discover what works best for your flying style. With the ability to switch rates during flight using a switch, you can experiment fearlessly, knowing that a different profile is always just a flip away.
With the right configuration and quality components from Mall of Aviation, your FPV experience becomes smoother, faster, and more versatile than ever before.
Recommended Resources:
For more detailed information on rate profiles, visit the Betaflight Official Website. To dive deeper into rate theory, check out the Oscar Liang RC Rate Guide. For high-quality radios and FPV gear, explore GetFPV and RaceDayQuads.